4. Managing Virtual Machines
Important
Virtual machines, even if idle or in shutdown state, allocate resources which therefore aren’t available to other users. Therefore please delete the virtual instances that you don’t plan to use anymore in the near future.
Cloud administrators perform regular campaigns to identify and possibly delete unused instances.
4.1. Creating Virtual Machines
To create a Virtual Machine (VM) you need to have first:
created your private key (as explained in Creating a keypair)
set the security group(s) (as discussed in Setting security group(s)) to be used for this VM.
To create a VM using the dashboard proceed as follows:
Be sure you have selected the right Project from the dropdown menu on the top.
Go to Compute → Instances on the left hand menu. This will display a list of VMs currently running in your project.
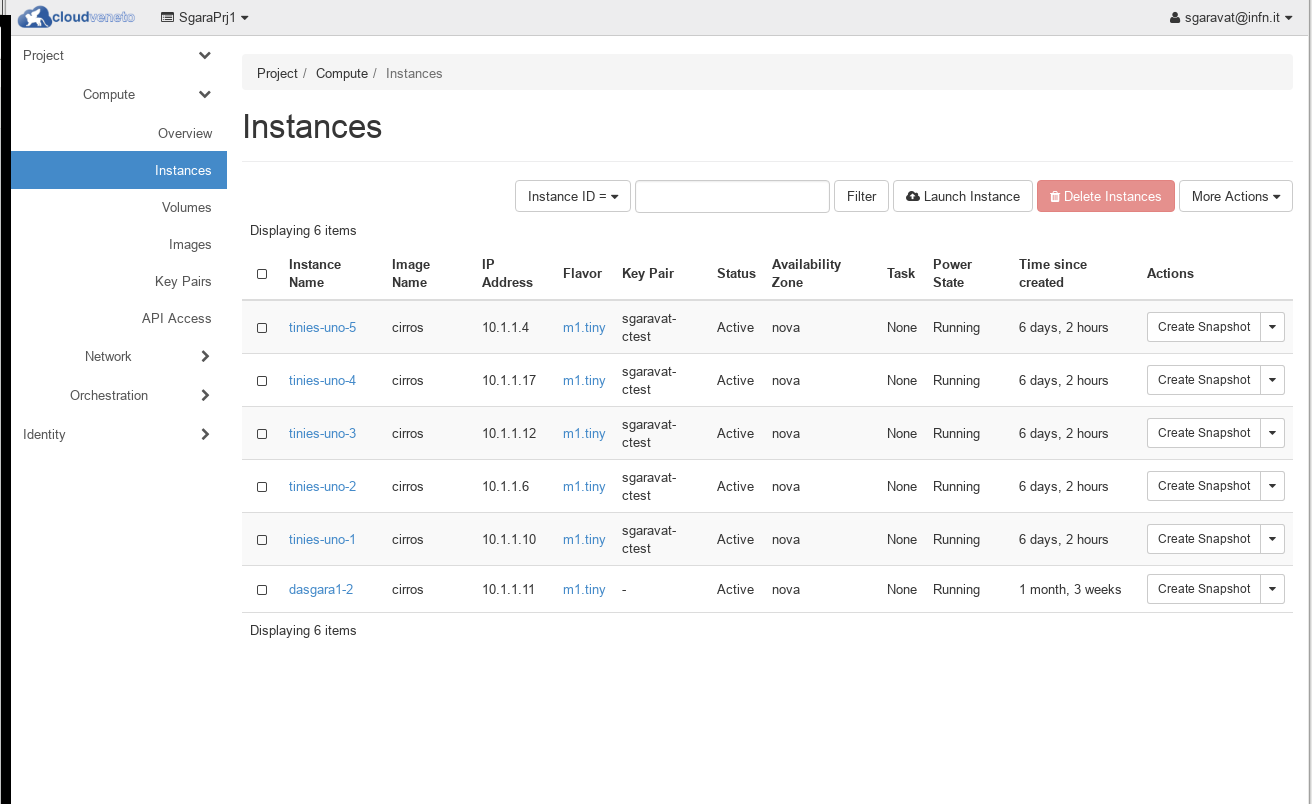
Select the Launch Instance button. A new window appears.
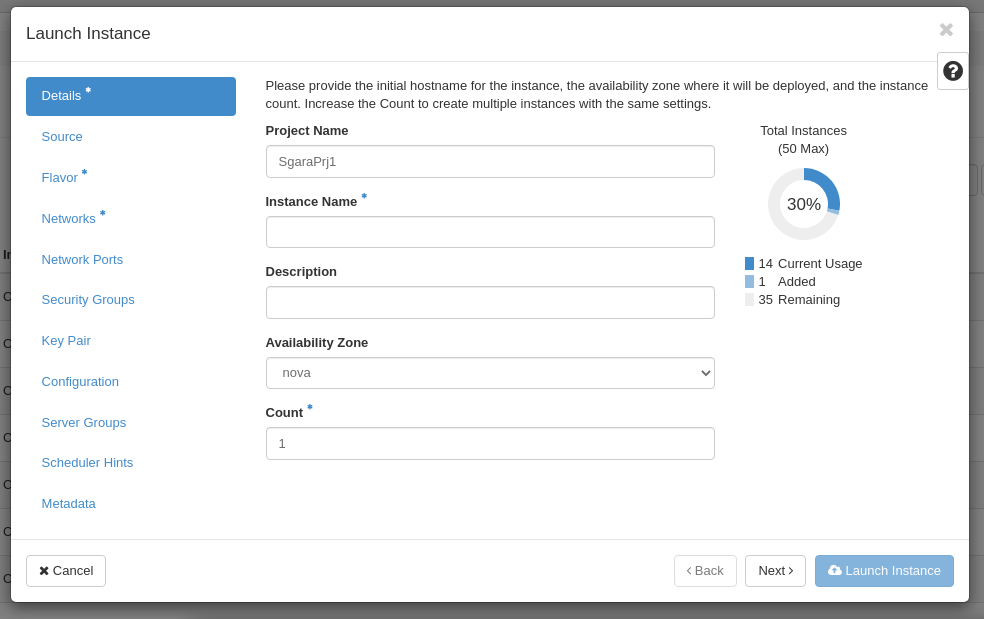
In the Details tab enter:
Instance name is the name of the machine you want to create.
Count is the number of virtual machines to be started.
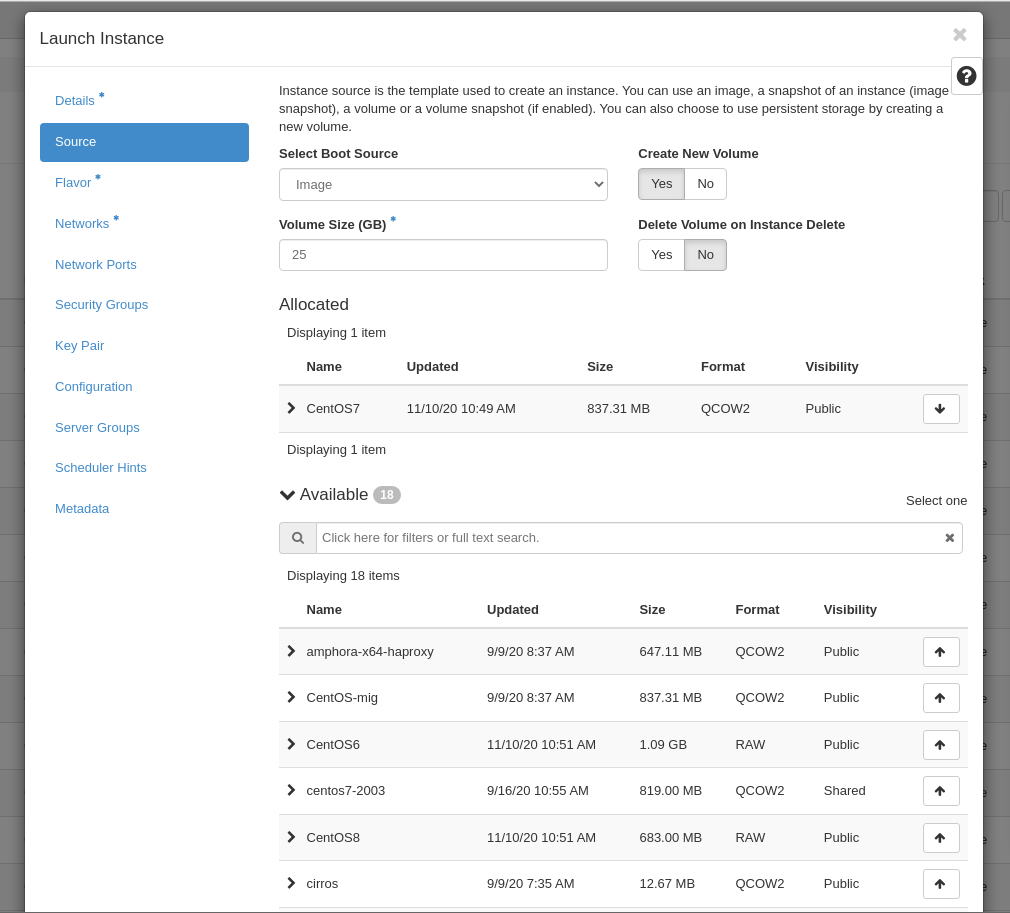
Switch to the Source tab:
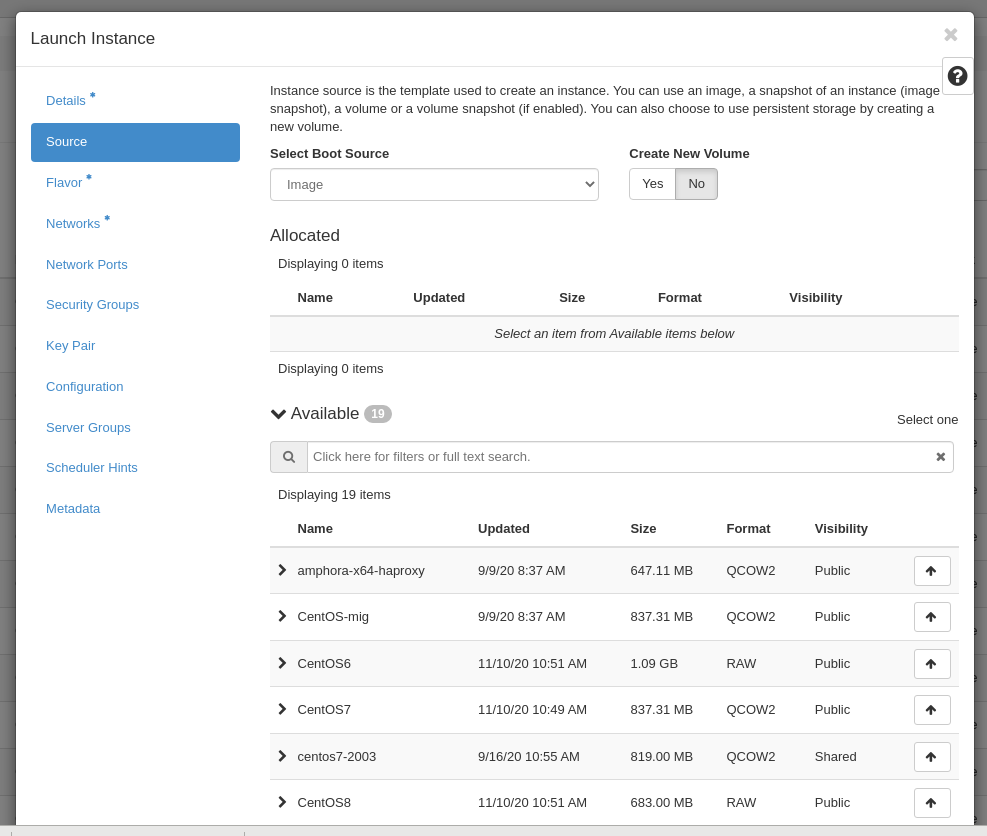
Unless you want to start a VM from a volume (see Improve reliability: creating Virtual Machines from Volumes), as Select Boot Source select Image or Instance Snapshot and then select the one to be used.
Switch to the Flavor tab:
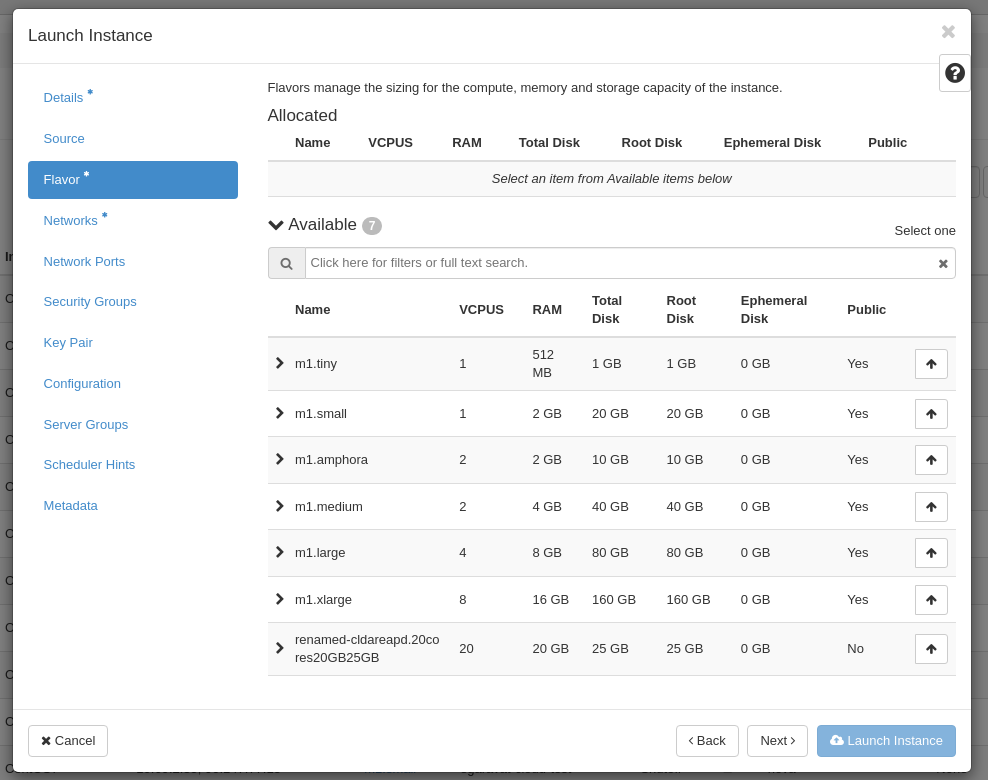
Select the desidered flavor. The flavor is the size of the machine you want to create. This is specified using VCPUs (number of virtual CPUs), disk space for the system disk, size for the RAM memory. It is recommended to possibly use small flavors (the flavor of a virtual machine can be changed later if required). Flavors are discussed in Flavors.
Switch to the Networks tab:
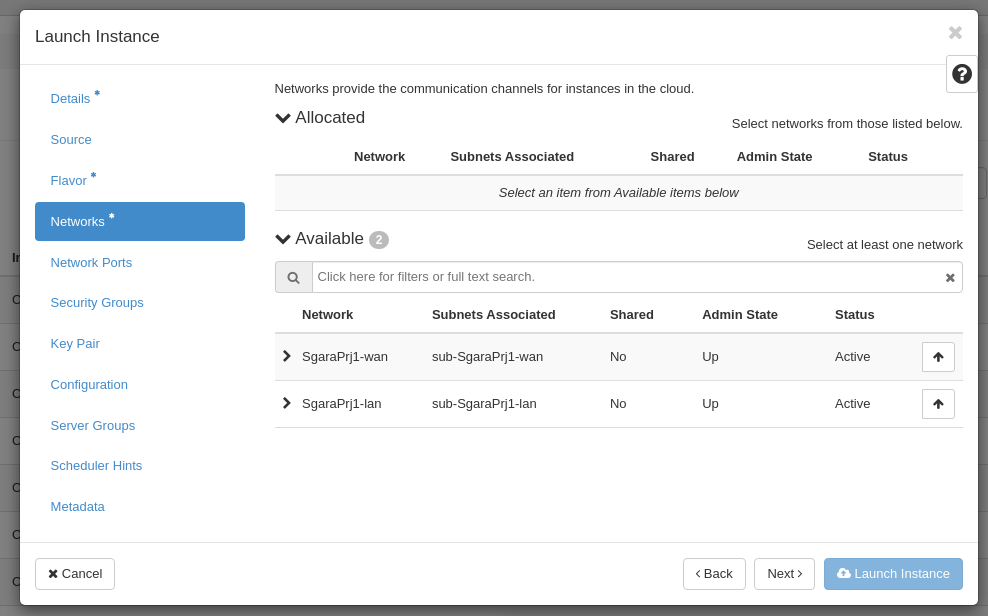
You should see at least one network called <ProjectName>-lan. Select that one.
Note
INFN users could see, besides the <ProjectName>-lan network, also a network called <ProjectName>-wan, if the possibility to use public IP numbers was requested. The former one must be selected if the VM doesn’t need to be visible on the Internet. The <ProjectName>-wan network must be selected if instead the VM must have a public IP. It will then be necessary to allocate a public (floating) IP address to this instance, as explained in Giving a VM public access (getting a floating IP).
Switch to the Security Groups tab:
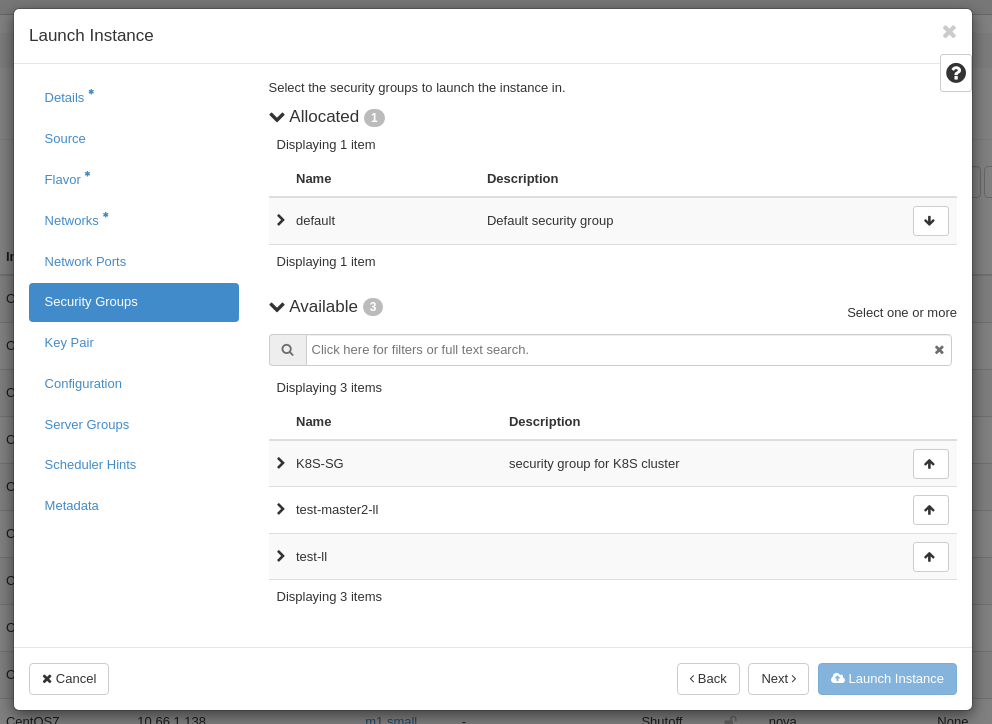
Select the security group(s) to be used for this VM (security groups are discussed in Setting security group(s)).
Switch to the Key Pair tab:
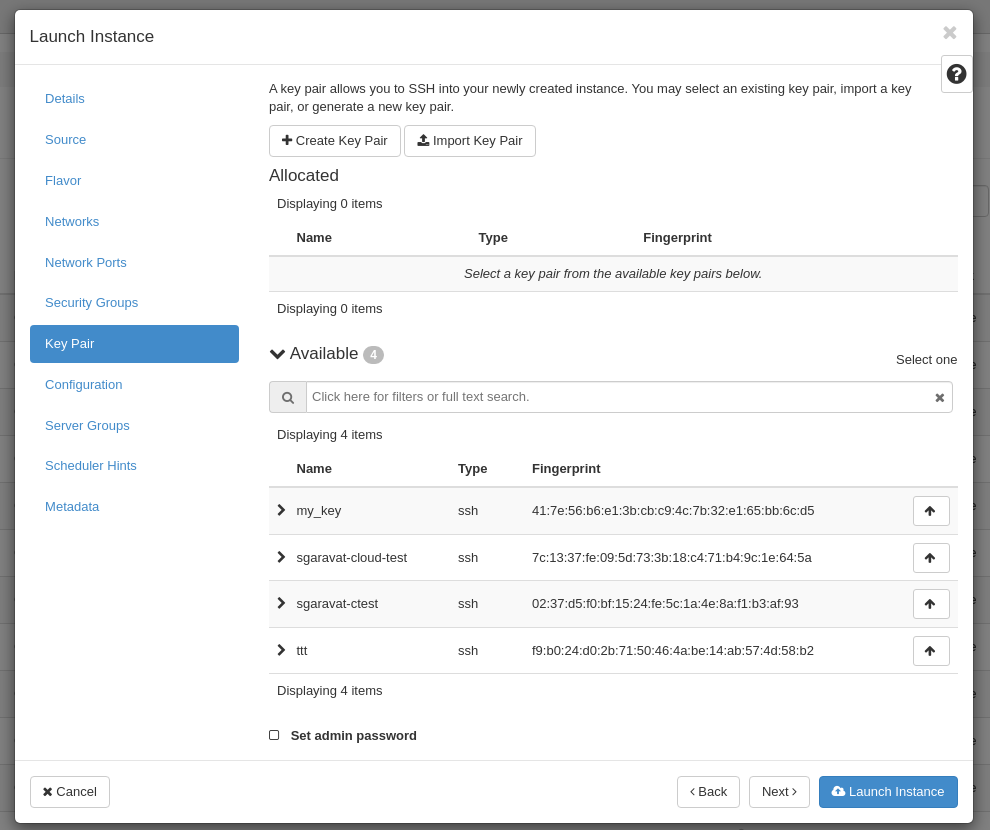
Select the keypair you want to use. This will allow you to log to the VM (usually as root or as an account where you can get admin privileges via sudo) using this SSH key.
You can also specify the admin (usually root) password of the instance, enabling the Set admin password box.
Warning
Please note that setting the admin password is not guaranteed to always work (the image can’t support the “injection” of this password). It is therefore strongly suggested to rely on the ssh-key mechanisms.
Select Launch Instance to start the virtual machine being created. You will be returned to the Overview screen, where there will be a line with the instance name, ip adress and status. The status should be ‘Active’ once the install is complete.
Once the status of the machine is ‘Active’, you can watch the console to see it installing and booting. You can click on the VM name and go to a dedicated window or from this same table you can access a pull down menu on the right hand side under Actions. There you will see various options and among them View Log and Console.
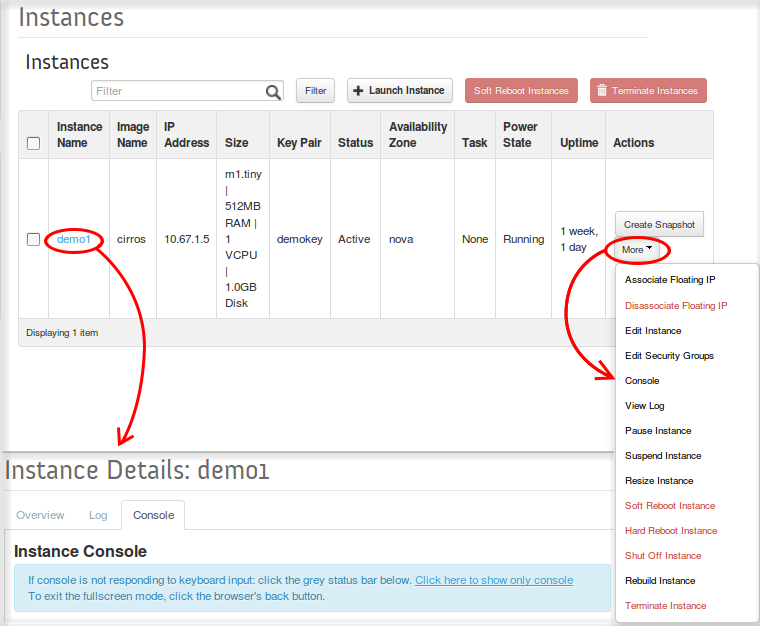
For a Linux machine, select Console to access to the console of the VM.
4.1.1. Improve reliability: creating Virtual Machines from Volumes
By default Virtual Machines are instantiated using the local disk of the Cloud compute node. This means that, in case of failure of the compute node, it may happen that the virtual machine content is lost.
For production servers which are not fully redundant, to improve the availability it is advisable to use external storage (i.e. a volume) for the system disk of the virtual machine. The advantage is also that, if the compute node hosting the virtual machine has to be switched off e.g. for maintenance, the Cloud administrator before doing this operation can live-migrate the instance to another Cloud compute node basically without any service interruption.
On the other hand, I/O performance is usually better when the instance is created using the local disk of the compute node with respect to a virtual machine created from volume.
To create a VM from volume, proceed as explained in Creating Virtual Machines, but in the Source tab please:
specify ‘Yes’ for Create New Volume
specify ‘No’ for Delete Volume on Instance Delete
specify the desired volume size
4.2. Accessing Virtual Machines: the big picture
Once your VM is in the “running” state you access it through ssh with a default username (more on that later) and your private key.
There are three possible scenarios:
You are a INFN user, so you might have access to the internal INFN network: from there you can contact directly your VM on a network like 10.64.x.y;
You don’t have such access or you are connecting from outside such network: you must access a “gate” machine first and then access the VM;
You need to perform that “one shot operation” or you want to check the state of your VM: you can use the “Console” tab of your VM via web.
Note
Virtual Machines instantiated on the Cloud by default aren’t registered in the DNS. This means that you’ll have to refer to them using their IP numbers.
4.3. Logging to a VM
Virtual machines created on the cloud have their IP assigned on a private network associated with the project they belong to. Therefore they cannot be accessed directly from the internet.
If you need to log on your VMs from the Internet you must go through a gate machine: gate.cloudveneto.it.
When your account on the cloud is created, credentials for accessing such gate are sent to you. Contact support@cloudveneto.it in case of problems with this credentials.
Note
Projects created (mostly) for INFN users get their private network on a 10.64.x.y address. The VMs on these networks can be accessed directly from the INFN-Padova or INFN-Legnaro Local Area Networks (LANs).
Assuming that
You created a Linux virtual machine using the <ProjectName>-lan network;
Your VM got the 10.67.15.3 IP address;
You know the default user on the VM
For CentOS based instances there is a default user called ‘centos’;
For AlmaLinux based instances there is a default user called ‘almalinux’
For Ubuntu based instances there is a default user called ‘ubuntu’;
You stored your my_key keypair in ~/private on the gate machine;
you can access your VM from the gate machine issuing
ssh -i ~/private/my_key ubuntu@10.67.15.3
Conversely, there is no limitation on the ‘outer’ services you can reach from your VM (modulo the services hosted in the INFN Padova/Legnaro LANs, as described in Accessing other hosts/services from Virtual Machines).
4.3.1. Common access problems
You might receive an error upon logging to a VM. Two of the most common are:
PROBLEM SYMPTOM:
@@@@@@@@@@@@@@@@@@@@@@@@@@@@@@@@@@@@@@@@@@@@@@@@@@@@@@@@@@@
@         WARNING: UNPROTECTED PRIVATE KEY FILE!          @
@@@@@@@@@@@@@@@@@@@@@@@@@@@@@@@@@@@@@@@@@@@@@@@@@@@@@@@@@@@
Permissions 0644 for '/home/user/my_key.pem' are too open.
It is required that your private key files are NOT accessible by others.
This private key will be ignored.
Load key "/home/user/my_key.pem": bad permissions
ubuntu@10.64.14.12: Permission denied (publickey).
SOLUTION: you forgot to change the permission on your private key (see Creating a keypair). Please run:
chmod 600 /home/user/my_key.pem
and try again.
PROBLEM SYMPTOM:
@@@@@@@@@@@@@@@@@@@@@@@@@@@@@@@@@@@@@@@@@@@@@@@@@@@@@@@@@@@
@    WARNING: REMOTE HOST IDENTIFICATION HAS CHANGED!     @
@@@@@@@@@@@@@@@@@@@@@@@@@@@@@@@@@@@@@@@@@@@@@@@@@@@@@@@@@@@
IT IS POSSIBLE THAT SOMEONE IS DOING SOMETHING NASTY!
Someone could be eavesdropping on you right now (man-in-the-middle attack)!
It is also possible that the RSA host key has just been changed.
The fingerprint for the RSA key sent by the remote host is
c8:1b:1d:37:61:ee:9f:e4:db:5b:31:91:35:7b:d2:59.
Please contact your system administrator.
Add correct host key in /home/user/.ssh/known_hosts to get rid of this message.
Offending key in /home/user/.ssh/known_hosts:3
RSA host key for 10.64.51.7 has changed and you have requested strict checking.
Host key verification failed.
SOLUTION: the IP of your VM has probably been reused. You need to delete the offending entry on your /home/user/.ssh/known_hosts file. For example you can use:
sed -i '/^10.64.51.7 ssh/d' .ssh/known_hosts
and try again to connect.
4.4. Accessing a VM in the “graphical way”
This section explains how to access a VM in the graphical way.
You first need to configure your VM (see below two examples that applies to AlmaLinux9 and Ubuntu 22.04 VMs). This operation must be done once.
Then from your notebook create the relevant tunnels, e.g.:
ssh -i <SSH KEY file> -J gate.cloudveneto.it -L 5901:localhost:5901 almalinux@<VM IP>
You can now access the graphical interface of the VM from your notebook using a remote desktop software such as TigerVNC Viewer or Mobaxterm (https://mobaxterm.mobatek.net/download.html): referring to the previous example you’ll just need to connect to ‘localhost:5901’.
In this example ‘almalinux’ is the account of the VM.
4.4.1. Configure a AlmaLinux9 VM for remote graphical access
Log in to the VM
ssh -i <file key>.key almalinux@<IP VM>
Then:
sudo su -
dnf update
dnf install yum-utils
yum-config-manager --set-enabled crb
dnf install epel-release
dnf groupinstall "Server with GUI"
dnf install tigervnc-server
systemctl set-default graphical
Edit the file /etc/tigervnc/vncserver-config-defaults adding the option:
localhost
Edit the /etc/tigervnc/vncserver.users assigning the console 1 to the relevant user (‘almalinux’ in our example).This is done adding a line to the file:
:1=almalinux
As user ‘almalinux’ (or the user you want to consider) set a VNC password:
exit
vncpasswd
and create the file ~/.vnc/config with this content:
geometry=1920x1080
localhost
Then:
sudo su -
systemctl enable vncserver@:1.service
systemctl start vncserver@:1.service
reboot
To complete the setup log in again to the VM
ssh -i <file key>.key almalinux@<IP VM>
and issue the following commands:
 gsettings set org.gnome.desktop.screensaver idle-activation-enabled false
 gsettings set org.gnome.desktop.screensaver lock-enabled false
 sudo su -
systemctl restart vncserver@:1.service
You have done ! You can now connect to the graphical interface of the VM from your notebook using a remote desktop software, as explained above.
If you prefer to use KDE Plasma as window manager, please install the following packages:
dnf groupinstall "KDE Plasma Workspaces"
Edit the file ‘/etc/tigervnc/vncserver-config-defaults’ adding:
session=kde
Then reboot the VM
Another option is using MATE as windows manager. In this case install the following packages:
dnf install NetworkManager-libreswan-gnome NetworkManager-openconnect-gnome NetworkManager-openvpn-gnome atril atril-caja atril-thumbnailer caja caja-actions caja-image-converter caja-open-terminal caja-sendto caja-wallpaper caja-xattr-tags dconf-editor engrampa eom f36-backgrounds-base f36-backgrounds-extras-base f36-backgrounds-extras-mate f36-backgrounds-mate f37-backgrounds-base f37-backgrounds-extras-base f37-backgrounds-extras-mate f37-backgrounds-mate filezilla gnome-epub-thumbnailer gparted gucharmap hexchat marco mate-applets mate-backgrounds mate-calc mate-control-center mate-desktop mate-dictionary mate-disk-usage-analyzer mate-icon-theme mate-media mate-menus mate-menus-preferences-category-menu mate-notification-daemon mate-panel mate-polkit mate-power-manager mate-screensaver mate-screenshot mate-search-tool mate-session-manager mate-settings-daemon mate-system-log mate-system-monitor mate-terminal mate-themes mate-user-admin mate-user-guide lightdm mozo network-manager-applet p7zip p7zip-plugins parole pavucontrol pluma seahorse seahorse-caja setroubleshoot simple-scan slick-greeter-mate system-config-printer system-config-printer-applet thunderbird transmission-gtk usermode-gtk
Edit the file ‘/etc/tigervnc/vncserver-config-defaults’ adding:
session=mate
To complete the setup reboot the VM.
4.4.2. Configure a Ubuntu 22.04 VM for remote graphical access
Log in to the VM
ssh -i <file key>.key ubuntu@<IP VM>
Then:
sudo su -
apt-get update
apt install ubuntu-desktop
apt install tigervnc-standalone-server
Edit the file /etc/tigervnc/vncserver-config-defaults adding the option:
$localhost = "yes";
Edit the /etc/tigervnc/vncserver.users assigning the console 1 to the relevant user (‘ubuntu’ in our example).This is done adding a line to the file:
:1=ubuntu
Set a password for the user ‘ubuntu’ (or the user you want to consider):
passwd ubuntu
As user ‘ubuntu’ (or the user you want to consider) set a VNC password:
exit
vncpasswd
and create the file ~/.vnc/config with this content:
geometry=1920x1080
localhost
Then:
sudo su -
systemctl enable tigervncserver@:1.service
systemctl start tigervncserver@:1.service
reboot
You have done ! You can now connect to the graphical interface of the VM from your notebook using a remote desktop software, as explained above.
4.5. Access a service running on the VM
Your VM might be running some service (e.g. an http server) you want to access from the net. Since VMs are on a private network this might be tricky. A clever approach is to use an SSH tunnel (port forwarding mechanism). This technique allows you to transport a TCP port opened on your VM directly on your PC. TCP port 22 can be used for ssh/scp access but any port (e.g. 80 or 443 for a web service) will do. This same mechanism can be used to transport multiple ports at once.
USE CASE 1: Suppose you want to access a web service answering on port 80 of your VM (IP address is 10.X.Y.Z).
Proceed as follows:
Choose a free TCP port on your machine in the range 1025-65535 (e.g. 2080);
Set up the tunnel using your access to the gate machine of the cloud (i.e.. gate.cloudveneto.it) and providing your TCP port of choice and the IP address of your remote VM:
ssh -L2080:10.X.Y.Z:80 user@gate.cloudveneto.it
The tunnel needs to stay open as long as you need to access the VM.
The syntax is explained in the following picture:
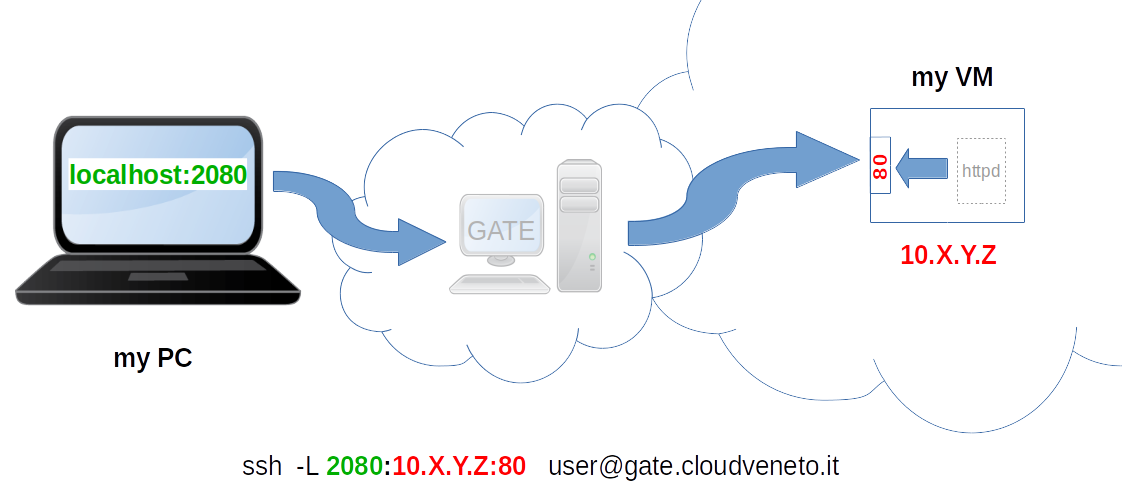
The green part is your side of the connection (e.g. the port opened on your PC);
user@gate….. is the transport part of the connection;
10.X.Y.Z:80 in red is the remote end of the connection.
The blu arrows depict the data flow.
Once you have opened the tunnel you have, on your machine, a direct entry point to your VM (port 2080 in this case).
From a browser on your local machine, you can now access the web service running on the VM at the url
http://localhost:2080
USE CASE 2: you want to access both the web service on port 80 and the ssh service (port 22) on your VM. Proceed as follows:
Choose two free TCP port on your machine in the range 1025-65535 (e.g. 2080 and 2022);
Set up the tunnel using your access the gate machine of the cloud (i.e. gate.cloudveneto.it) and providing your TCP ports of choice and the IP address of your remote VM:
ssh -L2080:10.X.Y.Z:80 -L2022:10.X.Y.Z:22 user@gate.cloudveneto.it
The tunnel needs to stay open as long as you need to access the VM.
From another terminal of your local machine, you can now:
access the VM using ssh with the -p (lowercase ‘p’) parameter:
ssh -p 2022 -i ~/private/my_key remoteuser@localhost
( e.g.: ssh -p 2022 -i ~/paolo.pem ubuntu@localhost )
copy a file on the VM using scp with the -P (capital ‘p’) parameter
scp -P 2022 -i ~/private/my_key my_local_file.txt remoteuser@localhost:/remote/path/
( e.g. scp -P 2022 -i ~/paolo.pem my_local_file.txt ubuntu@localhost:/tmp/ )
from your web browser you can access the web service on the VM by accessing the url
http://localhost:2080
If sshfs is installed, you can use it with the tunnel with the following command
sshfs -p 2022 remoteuser@localhost:/remote/path /local/path -o IdentityFile=~/private/my_key
It is a file system client that mounts the remote file system locally.
Note
Tip: if the last part of your VM IP is Z, choosing 2000+Z as the local TCP port is a good way to memorize the (local port → remote VM) association of your tunnel.
4.6. Copying files to a VM
Copying files to your VM might be a little more complex since VMs don’t have an access facing the internet. Your options are:
Access the VM directly if you are using the INFN network;
Use one of the gate machines and make it in a two step fashion:
Copy your file from your machine to the gate;
Copy file from the gate machine to your VM;
Exploit the port forwarding mechanism explained in the previous section to access port 22 of your VM from your PC, so, e.g.:
ssh -L2022:10.X.Y.Z:22 user@gate.cloudveneto.it
scp -P 2022 -i ~/private/my_key  my_local_file.txt  remoteuser@localhost:/remote/path/
4.7. Giving a VM public access (getting a floating IP)
If needed, e.g. if a VM should host a service accessible from the Internet, such VM on the Cloud can be given a public IP. For this purpose you will need:
to instantiate the VM, as explained in Creating Virtual Machines;
Important
INFN users will have to create the VM on the <ProjectName>-wan network, if the VM must be given a public IP.
to allocate a floating (public) IP;
to associate the allocated floating IP to the relevant VM.
Floating IP addresses can have their associations modified at any time, regardless of the state of the instances involved.
The following procedure details the reservation of a floating IP address from an existing pool of public addresses and the association of that address to a specific instance.
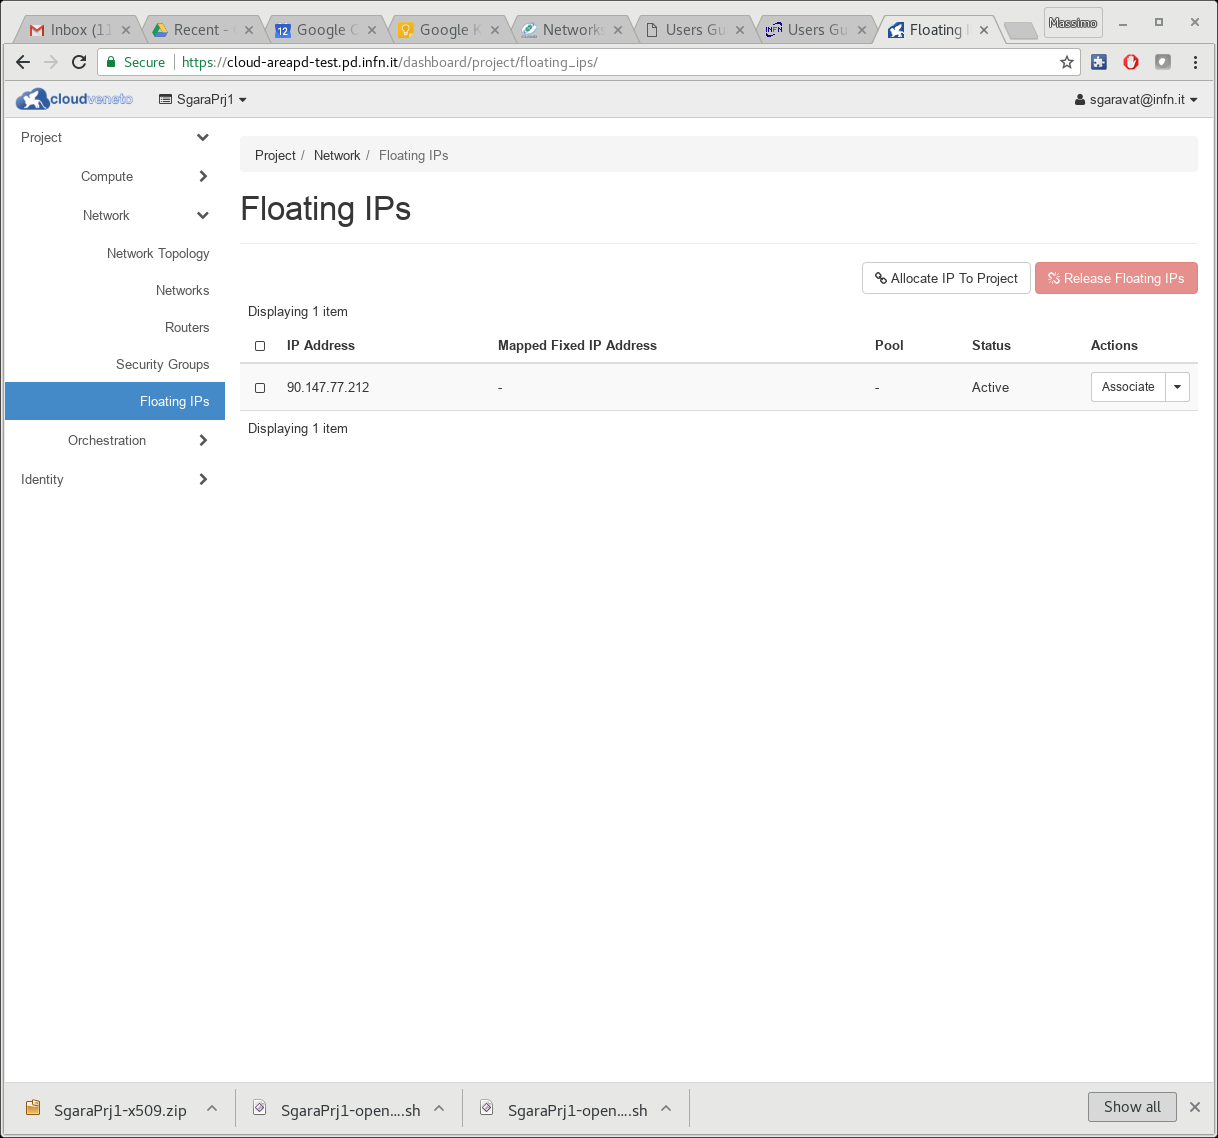
From the dashboard click Floating IPs on the Network menu.
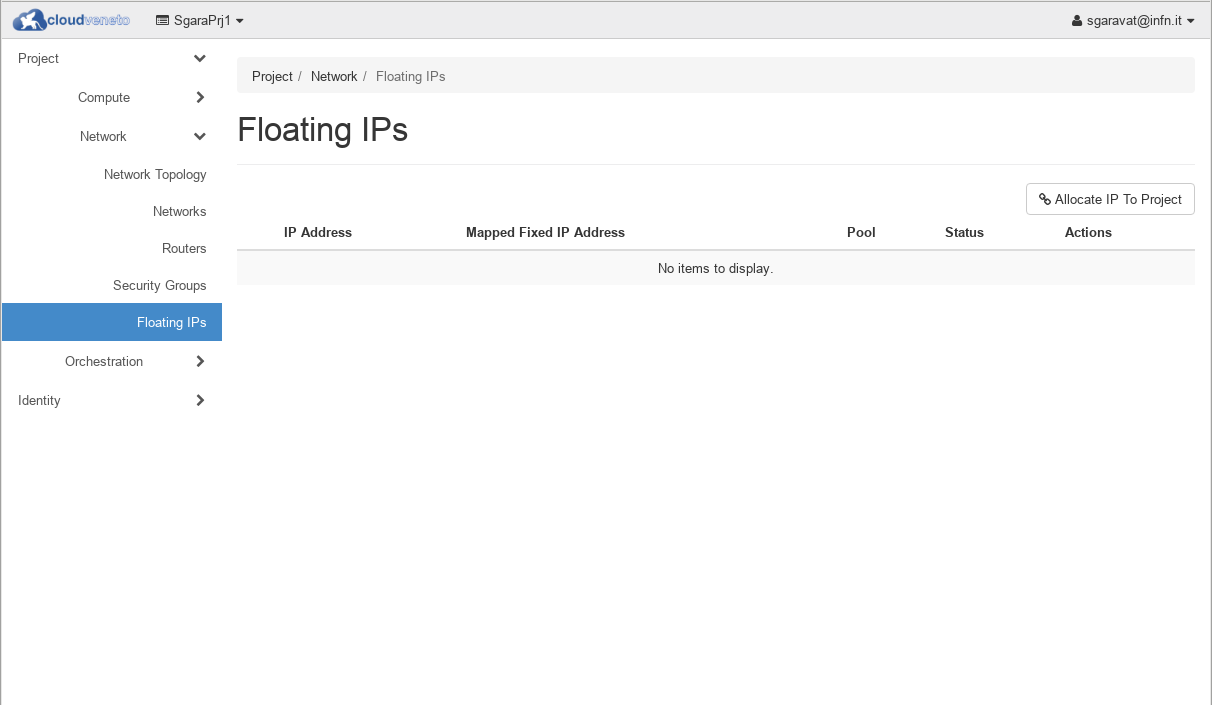
Click Allocate IP To Project.
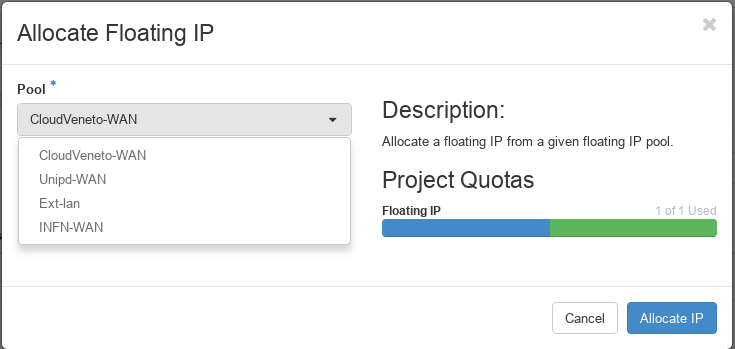
Choose the pool from which to pick the IP address. You must choose:
INFN-WAN, if you are a INFN user (i.e. if the IP address of your instance is 10.63.x.y);
Unipd-WAN, if you are referring to a University of Padova project (i.e. if the IP address of your instances is 10.67.x.y);
CloudVeneto-WAN, in all other cases (i.e. if the IP address of your instances is 10.68.x.y).
Then click Allocate IP.
Click on Associate for the just allocated floating IP.
In the Manage Floating IP Associations dialog box, choose the following options:
The IP Address field is filled automatically, but you can add a new IP address by clicking the + button
In the Ports to be associated field, select a port from the list (the list shows all the instances with their fixed IP addresses).
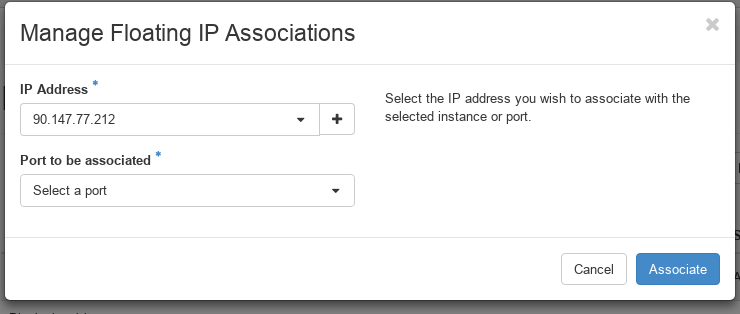
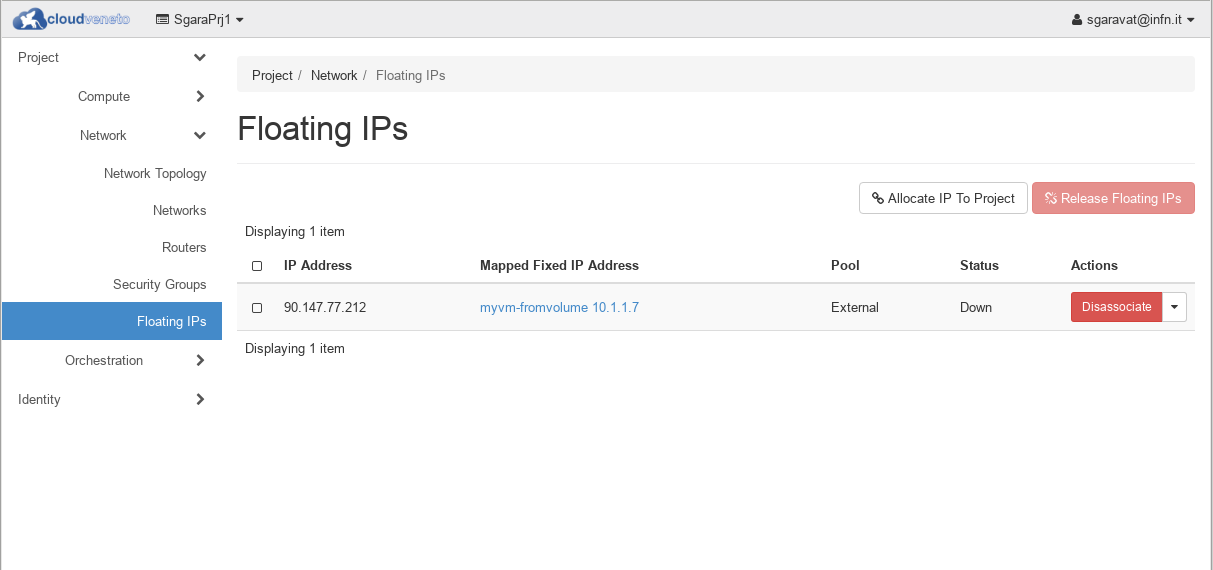
Finally click Associate.
To disassociate an IP address from an instance, click the Disassociate button.
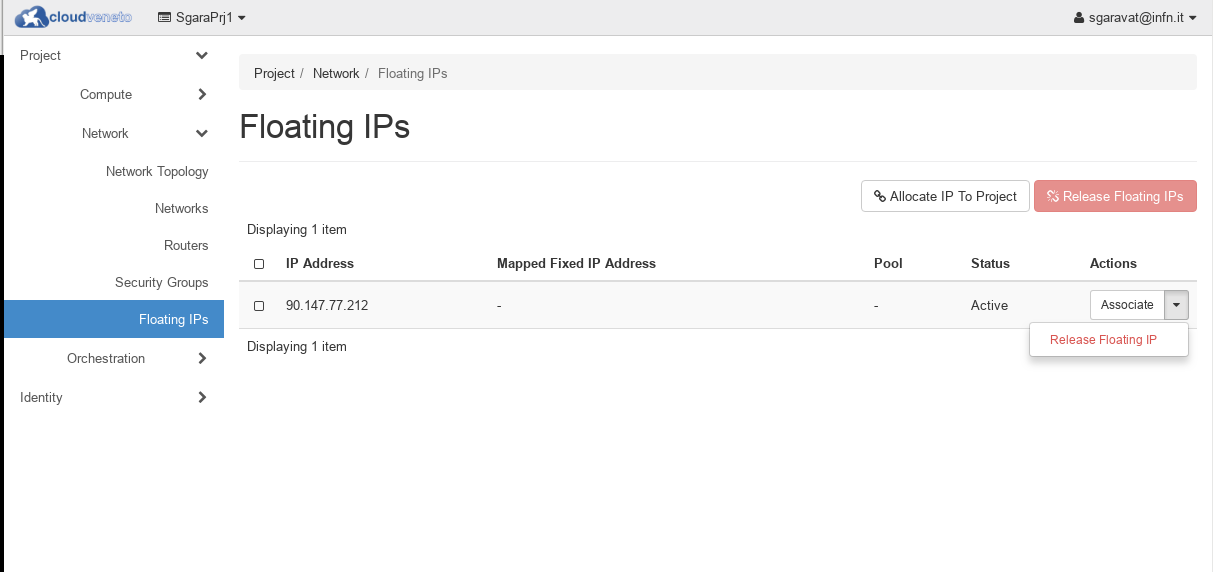
To release the floating IP address back into the pool of addresses, click the Actions button and select the Release Floating IP option.
Note
By default the possibility to use public IP numbers is disabled and therefore by default it is not possible to allocate a floating IP to an instance. If public IPs are needed for your project, please contact support@cloudveneto.it specifying what is/are the relevant service(s) and the port(s) that need to be open.
Warning
Instances with public floating IPs are regularly scanned to be sure they don’t expose vulnerable services. In case you are contacted by the CloudVeneto support team about a security problem, you need to promptly fix it. If this is not done, the use of the floating IP will be revoked.
To control which services/ports of your virtual machine can be accessed, be sure you are using the right security group (as discussed in Setting security group(s)) and you have correctly configured firewall (iptables, firewalld etc.) on the relevant VM.
4.8. Creating accounts on your Virtual Machine
Important
Please remember, that, as stated in the AUP that you accepted when you applied for an account on CloudVeneto, you can allow access to the Virtual Machines (VMs) only and exclusively to people who have already an account on this CloudVeneto service, or have an account at INFN Padova, or have an account at INFN Laboratori Nazionali di Legnaro. For projects using INFN resources, please remember that users have to be compliant with respect to what is specified in Prerequisites for using INFN resources.
If you need to create accounts on the virtual machine, please see Adding a user to your VM.
If you are an INFN user, and you are using a <operating-system>-INFNPadova-x86-64-<date> image, please see Public Images for INFN Padova users.
Important
Please also note that, as stated in the AUP, you will be held responsible for all the activities performed on the VMs created by yourself.
4.9. Accessing other hosts/services from Virtual Machines
There is no limitation on the ‘outer’ services you can reach from your VM. However by default it is not possible to access a host/service hosted in Padova or Legnaro.
If, for some reasons, you need to access some services hosted in Padova or Legnaro from the Cloud, please contact support@cloudveneto.it.
4.10. Flavors
As shown in Creating Virtual Machines, when an instance has to be created it is necessary to specify the flavor to be used for this VM.
Flavors define the virtual machine size such as:
Number of virtual CPU cores (VCPUs)
Amount of memory
Disk space
Information about the flavors can be seen in the Flavor Details box that appears in the Dashboard when you launch a new instance.
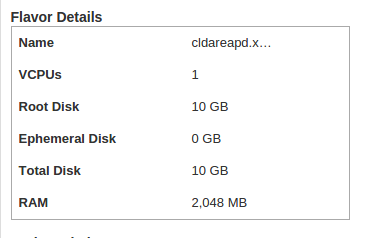
‘Root Disk’ is the size of the root disk. This is ephemeral storage, i.e. such storage is deleted when the relevant instance is deleted (see Ephemeral Storage).
‘Ephemeral Disk’ is the size of the supplementary ephemeral disk.
Warning
For what concerns VCPUs, please note that the CloudVeneto is configured to allow some “overbooking” so that usually a physical core is mapped to 4 VCPUs.
Note
If you find that a specific flavor you require is not available, please contact support@cloudveneto.it.
4.10.1. Flavors with supplementary ephemeral disk
An instance created using a flavor which has a supplementary ephemeral storage, usually automatically makes available this supplementary storage as the /dev/vdb device, through the /mnt directory. Unfortunately a ‘fat’ file system is used, which has some problems (e.g. it doesn’t allow the ‘chown’ operation). We suggest to reformat this file system using the xfs filesystem as soon as the machine is created:
sudo umount /mnt
sudo mkfs.xfs -f /dev/vdb
If the mkfs operation fails with a ‘device busy’ error message, edit the /etc/fstab file temporarily disabling (i.e. commenting-out) the mount of /mnt. Reboot the system and then retry the mkfs operation.
Finally edit the /etc/fstab replacing ‘auto’ with ‘xfs’ for the /mnt entry. You can then remount the /mnt filesystem:
sudo mount /mnt
4.11. Stopping and Starting VMs
VMs can be stopped and started in different ways available from the Actions menu of every instance found on the (Compute → Instances) table.
Warning
The cleanest way to shutdown (or reboot) an instance is however to log on the VM and issue from the shell the shutdown or reboot command.
4.12. Contextualisation
Contextualisation is the process to configure a virtual machine after it has been installed. Typical examples would be to create additional users, install software packages or call a configuration management system. These steps can be used to take a reference image and customize it further. Contextualisation is only run once when the VM is created.
Most of the available public images include a contextualisation feature using the open source cloud-init package.
With cloud-init, data to be used for contextualisation are called user data.
Using the Openstack command line tool, the --user-data option of the
nova boot command must be used, e.g.:
nova boot my_vm --image "SL65-Padova-x86_64-20141023-QCOW2" \
  --flavor m1.xsmall --user-data my_data.txt --key-name my_key
For example to run a command during contextualisation, the #cloud-config directive can be used:
cat > cern-config-users.txt << EOF
#cloud-config
runcmd:
 - [ /usr/bin/yum, "install", -y, "cern-config-users" ]
 - [ /usr/sbin/cern-config-users, --setup-all ]
EOF
User data can be provided as a gzip file if needed where the user data is larger than 16384 bytes, e.g.:
cat > userdata4zip.txt <<EOF
#!/bin/sh
wget -O /tmp/geolist.txt http://frontier.cern.ch/geolist.txt
EOF
gzip -c userdata4zip.txt > userdata4zip.gz

nova boot my_server --image "SL65-Padova-x86_64-20141023-QCOW2" \
  --flavor m1.xsmall --user-data userdata4zip.gz --key-name my_key
With the #include or Content-Type: text/x-include-url directives, it is possible to specify a list of URLs, one url per line. The userdata passed by the urls can be plain txt, gzip file or mime-multi-part script. E.g.:
cat userdata.txt <<EOF
#! /bin/bash
wget -O /tmp/robots.txt http://www.ubuntu.com/robots.txt
EOF

cat > userdata4include.txt <<EOF
#include
# entries are one url per line. comment lines beginning with '#' are allowed
# urls are passed to urllib.urlopen, so the format must be supported there
http://frontier.cern.ch/userdata.txt
EOF
cloud-init supply also a method called “multiple part” to supply user data in multiple ways, which means you can use userdata script and cloud-config (or other methods recognized by cloud-init) at the same time. cloud-init provides a script (write-mime-multipart) to generate a final userdata file. Here is an example:
cat > userdata4script <<EOF
#! /bin/bash
mkdir -p /tmp/rdu
echo "Hello World!" > helloworld.txt
EOF

cat userdata4config
#cloud-config
runcmd:
 - [ wget, "http://slashdot.org", -O, /tmp/index.html ]

cat userdata4include
#include
# entries are one url per line. comment lines beginning with '#' are allowed
# urls are passed to urllib.urlopen, so the format must be supported there
http://frontier.cern.ch/userdata.txt
Then use write-mime-multipart to generate userdata4multi.txt and use it to launch an instance:
write-mime-multipart -o userdata4multi.txt userdata4script userdata4config userdata4inc

nova boot my_server --image "SL65-Padova-x86_64-20141023-QCOW2" \
  --flavor m1.xsmall --user-data userdata4multi.txt --key-name my_key
On Internet a lot of documentation (along with examples) is available on cloud-init, such as in the Ubuntu Documentation.
4.13. Resizing Virtual Machines
If the size of a virtual machine needs to be changed, such as adding more memory or cores, this can be done using the resize operation. Using resize, you can select a new flavor for your virtual machine. The operation will reboot the virtual machine and might take several minutes of downtime, so this operation should be planned as it will lead to application downtime.
To resize a VM using the graphical Interface:
Detach any attached volume as decribed in Detaching a Volume
Warning
Failure in doing so might lead to VM and/or Volume corruption!
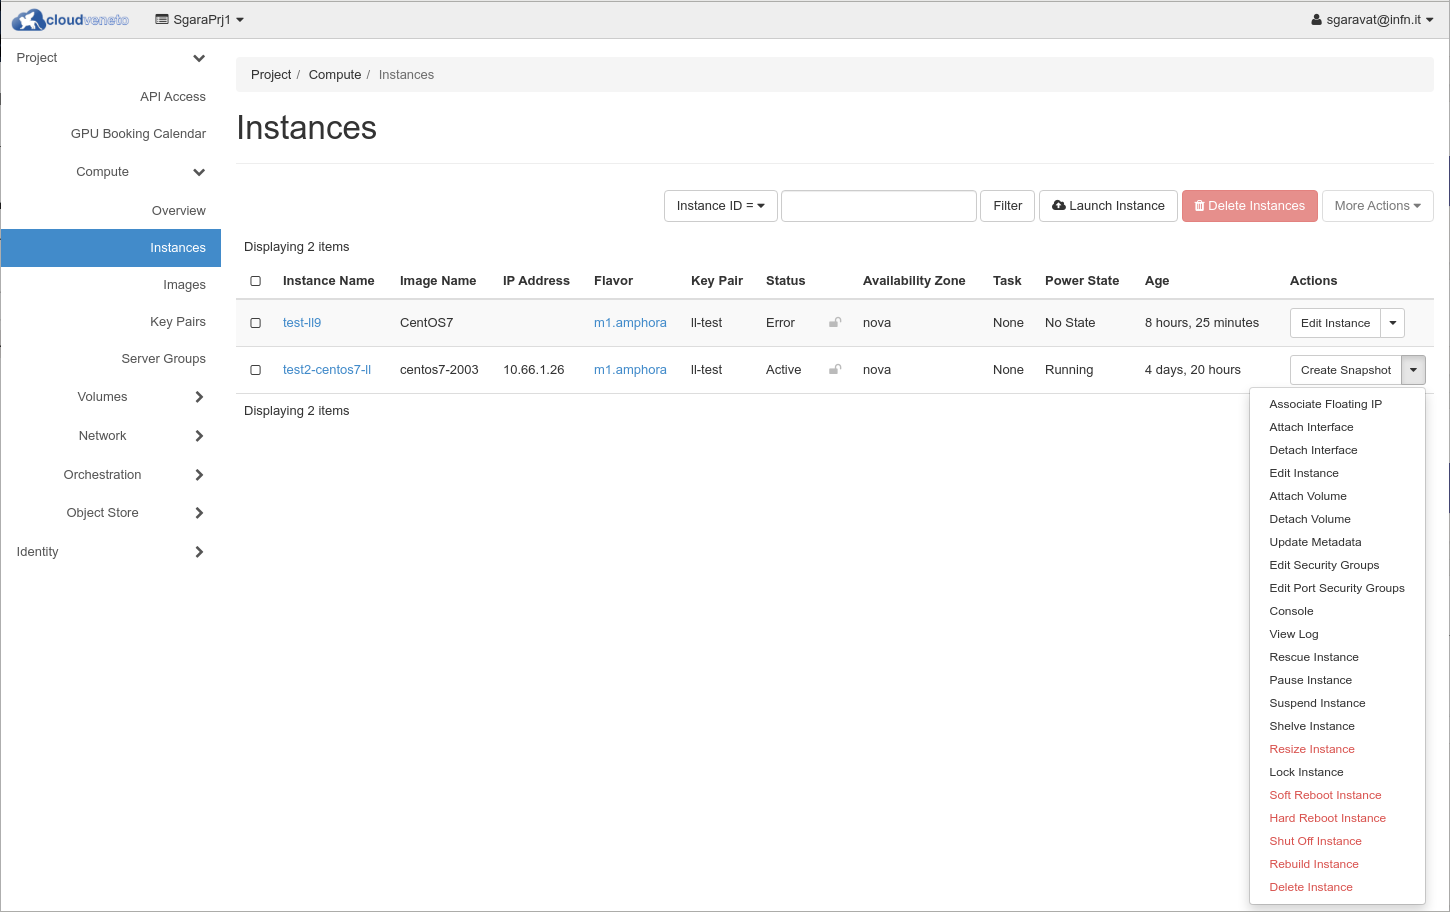
Select the Compute → Instances menu and then Resize Instance option on the Actions.
In the Resize Instance box select the desired flavor.
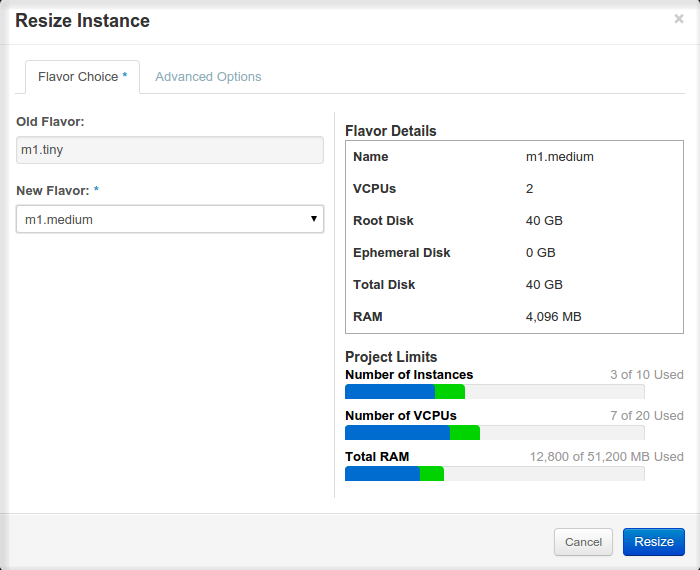
After the new flavor has been selected, the status will become ‘resize’ or ‘migrating’.
The status will change after several minutes to ‘Confirm’ or ‘Revert Resize/Migrate’. You may need to refresh the web browser page to reflect the new status.
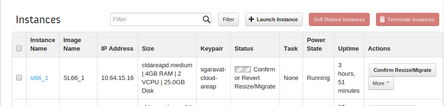
Select Confirm Resize/Migrate if you wish to change the instance to the new configuration.
The status will then change to ‘Active’ once completed.
4.14. Suspending Virtual Machines
To suspend an instance, from the Compute → Instances table select the desired VM and click Suspend Instance on the Actions menu.
When you suspend an instance, the state of the VM is stored on disk.
To resume a suspended instance, from the Compute → Instances table select the desired VM and click Resume Instance on the Actions menu.
Note
When you suspend a VM, the resources allocated for that instance are still reserved and therefore are not usable by other users.
4.15. Snapshotting Virtual Machines
A snapshot of a Virtual Machine is an image which preserves the disk state of that running instance. Snapshots can be used e.g. to backup your instances, or to migrate your instances to another cloud.
Snapshots can also be used to replicate an installation from one instance to new instances: new virtual machines can in fact be created from a previously saved snapshot of an instance. However, as described in User provided images, we suggest instead to create new fresh images, or to customize (using contextualization) existing images. If this is not possible, and therefore you need to create a snaphot of a VM (and then use such snapshot to create new instances), we suggest to use the smallest (in terms of disk size) flavor for the VM that will be snapshotted.
To save a snapshot of your VM:
Shutdown your VM: Log in as root to your VM. Please DO NOT shutdown the VM from the Openstack dashboard to make sure all data are correctly flushed on disk. Issue the shutdown -h now or poweroff command;
From the Compute → Instances table select the desired VM and click Create Snapshot on the Actions menu.
Warning
Only the content of the ‘root disk’ is saved when you do a snapshot. So if the instance was created using a flavor that has a supplementary ephemeral disk, the content of such disk is NOT saved and will be lost when snapshotting.
Note
In CloudVeneto snapshot size is limited to 25 GB.
Warning
A snapshot is saved with the same authorization policies as a private image. Therefore it can be accessed and used by the other members of your project.
4.16. Shelving Virtual Machines
The shelve functionality allows to suspend an instance. The data on the root disk of the VM will be stored in a snapshot automatically created once the instance is shelved. Data stored in the memory and elsewhere will not be retained.
This option allows you to release the resources dedicated to the instance, which are therefore usable by other users.
To shelve your VM:
Shutdown your VM: Log in as root to your VM. Please DO NOT shutdown the VM from the Openstack dashboard to make sure all data are correctly flushed on disk. Issue the shutdown -h now or poweroff command;
From the Compute → Instances table select the desired VM and click Shelve Instance on the Actions menu.
Warning
Only the content of the ‘root disk’ is saved when you shelve a VM. So if the instance was created using a flavor that has a supplementary ephemeral disk, the content of such disk is NOT saved and will be lost.
When you need to use again a shelved instance, you need to unshelve it. From the Compute → Instances table select the desired VM and click Unshelve Instance on the Actions menu.
Note
Please note that when you shelve an instance, the resources used by that VM are released and are available to host other instances, but the shelved instance is still accounted in the used quota.
4.17. Deleting Virtual Machines
VMs can be deleted using the Delete Instance option in the OpenStack dashboard.
Warning
This command will immediately terminate the instance, delete all content of the virtual machine and erase the ephemeral disk. This operation is not recoverable.
Important
Virtual machines, even if idle or in shutdown state, allocate resources which therefore aren’t available to other users. Therefore please delete the virtual instances that you don’t plan to use anymore in the near future. Before deleting your virtual machines, you may want to save a snapshot of their disk image, as explained above.
4.18. Migrating an instance to another project/cloud
The migration of an instance from one project to another one, or to a different OpenStack cloud, can be done using snapshots.
In short the procedure to migrate an instance is the following:
Create a snapshot of the instance in the source project (please refer to the instructions provided at Snapshotting Virtual Machines which also explain what are the restrictions of this procedure).
Transfer the snapshot from the source project to the destination one (this is discussed in Migrating an image to another cloud).
In the target environment boot a new instance from the snapshot.