13. Some basics on Linux administration
13.1. Introduction
The possession of great power necessarily implies great
responsibility.
— William Lamb, 2nd Viscount Melbourne
CloudVeneto provides an infrastructure where your virtual machines can live. After you have activated your virtual machine(s) you are on your own for the most part of the day to day administration tasks.
Note
We will only focus on Linux VMs, showing differences between the RedHat (AlmaLinux, CentOS, Fedora, … ) and Debian (Ubuntu, Mint, … ) distributions.
Throughout this chapter we will address the former with RH and the latter with DEB.
Some of these everyday tasks might be:
Use your VM as root only when needed;
Installing/deinstalling software;
Adding another user to your VM;
Formatting the volume you just attached to your VM;
Automatically remount the volume on next reboot.
In the following sections we provide some very small introductory instructions on performing such tasks.
13.2. Setting up ‘sudo’
Nobody (not even administrators) use a Unix/Linux system always as root.
If you do you should stop immediately (no jokes!).
Normally you have your user with limited privileges and, when needed,
you use su (which stands for ‘switch user’) to become root, perform
the privileged task and then you go back to the normal user.
A more flexible approach is using sudo (Super User DO) to perform the ‘one shot’ task or to allow certain users to perform only some tasks as the superuser. The configuration of sudo is performed by modifying the /etc/sudoers file or (better) by adding a file in the /etc/sudoers.d directory.
Follow these instructions to allow the user paolo (change this to your username) to perform any command as the superuser providing his own password, or to modify your user privileges (in this case there is already a file with your username in the /etc/sudoers.d directory):
Become the root user:
RH: using su and providing the root password
DEB: using sudo su - and providing your password
Create the file /etc/sudoers.d/paolo using your preferred editor;
Add this line inside the file:
paolo ALL = (ALL) ALL
If you want the user to do everything without even providing the password put this line instead:
paolo ALL = NOPASSWD: ALL
change the file permissions: chmod 0440 /etc/sudoers.d/paolo
Now when paolo logs in to the VM he is allowed to perform superuser tasks by prefixing the command with sudo.
If you want to limit the user to perform only certain commands (or classes of commands, e.g. installing/deinstalling software) you can look at the sudo documentation on your VM using
man sudoers
13.3. Managing software through the package manager
RedHat and Debian based linux distributions both have their software management system. On RH each software is packaged in rpm form (RPM stands for RedHat Package Manager) while DEB uses deb packages.
Package contents are not only copied on the VM when installed, but are also listed on a database that can be queried to search for new software, to find out which package installed which files and so on. (Note: there is no such functionality on Windows servers…).
Rather than manipulating the packages directly whith the rpm (RH) or dpkg (DEB) commands, you will mostly use a command line package manager such as yum or apt.
We will now try to install the wget package on a RH and a DEB system.
13.3.1. Managing software on RH distributions
Let’s try to install the wget software on CentOS or Fedora linux.
We will use yum (dnf on newest distributions) and rpm for the task.
Since we will be performing operations as the superuser, if you haven’t already, please set up sudo first.
Query the system to search for wget (no need to be root for that):
[paolo@maz03 ~]$ yum search wget
Loaded plugins: fastestmirror
Trying other mirror.
base                                                     | 3.6 kB     00:00
extras                                                   | 3.4 kB     00:00
updates                                                  | 3.4 kB     00:00
(1/4): base/7/x86_64/group_gz                              | 154 kB   00:00
(2/4): extras/7/x86_64/primary_db                          |  87 kB   00:00
(3/4): updates/7/x86_64/primary_db                         | 3.9 MB   00:00
(4/4): base/7/x86_64/primary_db                            | 5.1 MB   00:01
Determining fastest mirrors
 * base: mi.mirror.garr.it
 * extras: mi.mirror.garr.it
 * updates: mi.mirror.garr.it
============================== N/S matched: wget ===============================
wget.x86_64 : A utility for retrieving files using the HTTP or FTP protocols

  Name and summary matches only, use "search all" for everything.
Install the wget package (note that we are using sudo here):
[paolo@maz03 ~]$ sudo yum install wget
Loaded plugins: fastestmirror
Loading mirror speeds from cached hostfile
 * base: mi.mirror.garr.it
 * extras: mi.mirror.garr.it
 * updates: mi.mirror.garr.it
Resolving Dependencies
--> Running transaction check
---> Package wget.x86_64 0:1.14-10.el7_0.1 will be installed
--> Finished Dependency Resolution

Dependencies Resolved

================================================================================
 Package        Arch             Version                   Repository      Size
================================================================================
Installing:
 wget           x86_64           1.14-10.el7_0.1           base           545 k

Transaction Summary
================================================================================
Install  1 Package

Total download size: 545 k
Installed size: 2.0 M
Is this ok [y/d/N]: y
Downloading packages:
wget-1.14-10.el7_0.1.x86_64.rpm                            | 545 kB   00:00
Running transaction check
Running transaction test
Transaction test succeeded
Running transaction
  Installing : wget-1.14-10.el7_0.1.x86_64                                  1/1
  Verifying  : wget-1.14-10.el7_0.1.x86_64                                  1/1

Installed:
  wget.x86_64 0:1.14-10.el7_0.1

Complete!
Query the rpm database to see what has been installed:
[paolo@maz03 ~]$ rpm -ql wget
/etc/wgetrc
/usr/bin/wget
/usr/share/doc/wget-1.14
/usr/share/doc/wget-1.14/AUTHORS
/usr/share/doc/wget-1.14/COPYING
/usr/share/doc/wget-1.14/MAILING-LIST
/usr/share/doc/wget-1.14/NEWS
/usr/share/doc/wget-1.14/README
/usr/share/doc/wget-1.14/sample.wgetrc
/usr/share/info/wget.info.gz
/usr/share/locale/be/LC_MESSAGES/wget.mo
.....
.....
/usr/share/locale/sv/LC_MESSAGES/wget.mo
/usr/share/locale/tr/LC_MESSAGES/wget.mo
/usr/share/locale/uk/LC_MESSAGES/wget.mo
/usr/share/locale/vi/LC_MESSAGES/wget.mo
/usr/share/locale/zh_CN/LC_MESSAGES/wget.mo
/usr/share/locale/zh_TW/LC_MESSAGES/wget.mo
/usr/share/man/man1/wget.1.gz
You now decide you don’t need wget anymore. Remove the package (root needed!):
[paolo@maz03 ~]$ sudo yum remove wget
Loaded plugins: fastestmirror
Resolving Dependencies
--> Running transaction check
---> Package wget.x86_64 0:1.14-10.el7_0.1 will be erased
--> Finished Dependency Resolution

Dependencies Resolved

================================================================================
 Package       Arch            Version                     Repository      Size
================================================================================
Removing:
 wget          x86_64          1.14-10.el7_0.1             @base          2.0 M

Transaction Summary
================================================================================
Remove  1 Package

Installed size: 2.0 M
Is this ok [y/N]: y
Downloading packages:
Running transaction check
Running transaction test
Transaction test succeeded
Running transaction
  Erasing    : wget-1.14-10.el7_0.1.x86_64                                  1/1
  Verifying  : wget-1.14-10.el7_0.1.x86_64                                  1/1

Removed:
  wget.x86_64 0:1.14-10.el7_0.1

Complete!
13.3.2. Managing software on DEB distributions
Let’s try to install the wget software on Debian or Ubuntu linux.
We will use apt and dpkg for the task.
Since we will be performing operations as the superuser, if you haven’t already, please set up sudo first.
Update your local cache of available softwares (superuser privileges needed):
ubuntu@maz03:~$ sudo apt-get update
sudo: unable to resolve host maz03
Ign http://nova.clouds.archive.ubuntu.com trusty InRelease
Ign http://nova.clouds.archive.ubuntu.com trusty-updates InRelease
Hit http://nova.clouds.archive.ubuntu.com trusty Release.gpg
Get:1 http://nova.clouds.archive.ubuntu.com trusty-updates Release.gpg [933 B]
Hit http://nova.clouds.archive.ubuntu.com trusty Release
Ign http://security.ubuntu.com trusty-security InRelease
.....
.....
Fetched 10.2 MB in 3s (3257 kB/s)
Reading package lists... Done
Query the cache for wget (no privileges needed).
Note that DEB systems also query descriptions and ‘related’ softwares.
ubuntu@maz03:~$ apt-cache search wget
devscripts - scripts to make the life of a Debian Package maintainer easier
texlive-latex-extra - TeX Live: LaTeX additional packages
wget - retrieves files from the web
abcde - A Better CD Encoder
apt-mirror - APT sources mirroring tool
apt-zip - Update a non-networked computer using apt and removable media
axel - light download accelerator - console version
axel-dbg - light download accelerator - debugging symbols
axel-kapt - light download accelerator - graphical front-end
filetea - Web-based file sharing system
getdata - management of external databases
libcupt3-0-downloadmethod-wget - alternative front-end for dpkg -- wget download method
puf - Parallel URL fetcher
pwget - downloader utility which resembles wget (implemented in Perl)
snarf - A command-line URL grabber
wput - tiny wget-like ftp-client for uploading files
Install wget as the superuser:
ubuntu@maz03:~$ sudo apt-get install wget
sudo: unable to resolve host maz03
Reading package lists... Done
Building dependency tree
Reading state information... Done
The following NEW packages will be installed:
  wget
0 upgraded, 1 newly installed, 0 to remove and 25 not upgraded.
Need to get 269 kB of archives.
After this operation, 651 kB of additional disk space will be used.
Get:1 http://nova.clouds.archive.ubuntu.com/ubuntu/ trusty-updates/main wget amd64 1.15-1ubuntu1.14.04.1 [269 kB]
Fetched 269 kB in 0s (1218 kB/s)
Selecting previously unselected package wget.
(Reading database ... 51118 files and directories currently installed.)
Preparing to unpack .../wget_1.15-1ubuntu1.14.04.1_amd64.deb ...
Unpacking wget (1.15-1ubuntu1.14.04.1) ...
Processing triggers for man-db (2.6.7.1-1ubuntu1) ...
Processing triggers for install-info (5.2.0.dfsg.1-2) ...
Setting up wget (1.15-1ubuntu1.14.04.1) ...
Query the deb database and see what files have been installed by wget:
ubuntu@maz03:~$ dpkg -L wget
/.
/usr
/usr/bin
/usr/bin/wget
/usr/share
/usr/share/man
/usr/share/man/man1
/usr/share/man/man1/wget.1.gz
/usr/share/info
/usr/share/info/wget.info.gz
/usr/share/doc
/usr/share/doc/wget
/usr/share/doc/wget/copyright
/usr/share/doc/wget/AUTHORS
/usr/share/doc/wget/NEWS.gz
/usr/share/doc/wget/MAILING-LIST
/usr/share/doc/wget/README
/usr/share/doc/wget/changelog.Debian.gz
/etc
/etc/wgetrc
You now decide you don’t need wget anymore. Remove the wget software from the system (keep config files).
Note: you can alternatively ‘purge’ the software completely as described below.
ubuntu@maz03:~$ sudo apt-get remove wget
Reading package lists... Done
Building dependency tree
Reading state information... Done
The following packages will be REMOVED:
  wget
0 upgraded, 0 newly installed, 1 to remove and 25 not upgraded.
After this operation, 651 kB disk space will be freed.
Do you want to continue? [Y/n] Y
(Reading database ... 51129 files and directories currently installed.)
Removing wget (1.15-1ubuntu1.14.04.1) ...
Processing triggers for install-info (5.2.0.dfsg.1-2) ...
Processing triggers for man-db (2.6.7.1-1ubuntu1) ...
Discover which files have been left behind by the wget software:
ubuntu@maz03:~$ dpkg -L wget
/etc
/etc/wgetrc
Completely remove (purge) all the files installed by wget:
ubuntu@maz03:~$ sudo apt-get purge wget
Reading package lists... Done
Building dependency tree
Reading state information... Done
The following packages will be REMOVED:
  wget*
0 upgraded, 0 newly installed, 1 to remove and 25 not upgraded.
After this operation, 0 B of additional disk space will be used.
Do you want to continue? [Y/n] Y
(Reading database ... 51119 files and directories currently installed.)
Removing wget (1.15-1ubuntu1.14.04.1) ...
Purging configuration files for wget (1.15-1ubuntu1.14.04.1) ...
13.4. Adding a user to your VM
You may need to give access to your VM to another user. Given that there are no graphical tools or fancy icons to do the task you are going to user some command line tools.
We are going to add the user ‘pemazzon’ (Paolo E. Mazzon) to your system.
$ sudo useradd -m -c 'Paolo E. Mazzon' -s /bin/bash pemazzon
The meaning of parameters is:
-m = create a ‘home directory’ for the user under /home
-c = set this as a description of the user
-s = set this as the default shell for the user
Set a password for the user: you will decide a password that will be valid just for the first login. You will force the user to change it immediately.
$ sudo passwd pemazzon

... enter twice times the
    password you want to
    set for the user ...
Force the user to change his password on first logon:
$ sudo chage -d 0 pemazzon
Allow the user to connect via password authentication:
You need to enable the sshd configuration directive
PasswordAuthentication yes
This directive is set differently depending on what distribution and version you are using.
For ubuntu 20.04 you need to change it in
/etc/ssh/sshd_configFor ubuntu 22.04 or 24.04 you need to change it in
/etc/ssh/sshd_config.d/60-cloudimg-settings.confFor Almalinux 8 you need to change it in
/etc/ssh/sshd_configFor Almalinux 9 you need to change it in
/etc/ssh/sshd_config.d/50-cloud-init.conf
After the change restart the sshd (ssh on ubuntu 24.04) service with
systemctl restart sshd
Mail the user the password you have set.
13.5. Formatting/resizing a volume you just attached
We already showed on Using (attaching) a Volume how to start using a volume you have attached to your VM. We will give you here some more details.
If you just created an empty volume you first need to create a filesystem on it before you can put some data inside. The volume you just attached is merely ‘raw space’ and has no concept about files and directories.
You may also think about partitioning your volume, e.g. to split volume space in ‘slices’, as you may have done installing linux.
Given that in the CloudVeneto you can add as many volumes you want (up to your volume quota, of course) partitioning a volume is simply not recommended.
Suppose now that you have filled the volume space. You have the option to resize it from the cloud dashboard but the result may not be the one you expect until you do some operations from inside your VM.
We are going to resize the volume ‘test’ from 2 to 4 GB and use the newly available space on a VM.
We will create the volume from scratch. Obviously you can skip these 3 steps if you are resizing an existing volume.
Create a 2 GB volume named ‘test’ and attach it to one of your VM as described in Volumes
Create a filesystem and mount it as described in Using (attaching) a Volume
Check the available space is 2 GB and the filesystem is filling up the partition
ubuntu@maz03:~$ sudo fdisk -l /dev/vdb

Disk /dev/vdb: 2154 MB, 2154823680 bytes
15 heads, 30 sectors/track, 9352 cylinders, total 4208640 sectors
Units = sectors of 1 * 512 = 512 bytes
Sector size (logical/physical): 512 bytes / 512 bytes
I/O size (minimum/optimal): 512 bytes / 512 bytes
Disk identifier: 0x00000000

Disk /dev/vdb doesn't contain a valid partition table

ubuntu@maz03:~$ df -k /mnt
Filesystem     1K-blocks  Used Available Use% Mounted on
/dev/vdb         2005688  3096   1880992   1% /mnt
Let’s resize the volume
Umount it first from the VM (if mounted):
ubuntu@maz03:~$ sudo umount /dev/vdb
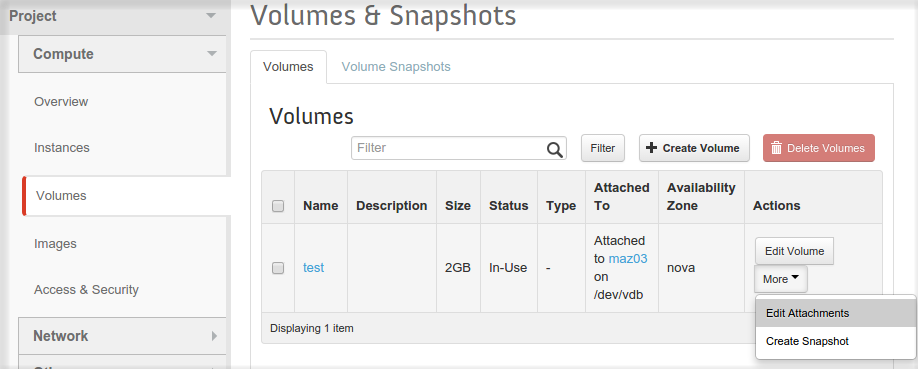
Detach it from the VM using the dashboard: use “Edit Attachments” and confirm your request.
When the volume is detached the “Extend Volume” option will be available. Select it…
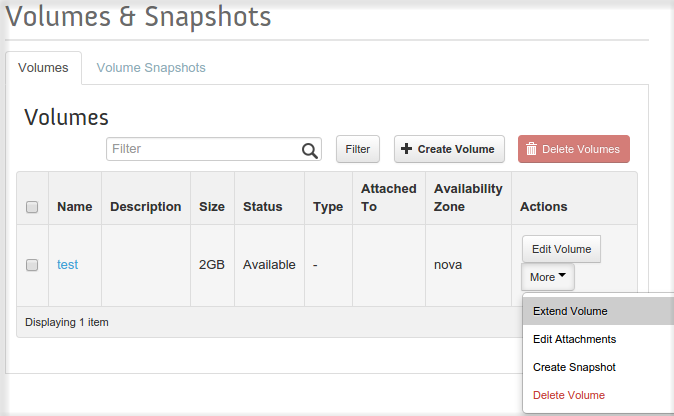
… and grow the volume to, say, 4GB:

Now attach again the volume to the VM and let’s check, from inside the VM, what’s happening:
ubuntu@maz03:~$ sudo mount /dev/vdb /mnt
ubuntu@maz03:~$ sudo fdisk -l /dev/vdb

Disk /dev/vdb: 4309 MB, 4309647360 bytes
16 heads, 63 sectors/track, 8350 cylinders, total 8417280 sectors
Units = sectors of 1 * 512 = 512 bytes
Sector size (logical/physical): 512 bytes / 512 bytes
I/O size (minimum/optimal): 512 bytes / 512 bytes
Disk identifier: 0x00000000

Disk /dev/vdb doesn't contain a valid partition table
The disk size is now 4309 MB, so the system recognize the fact that the volume have grown.
Let’s check the available space:
ubuntu@maz03:~$ df -k /mnt
Filesystem     1K-blocks  Used Available Use% Mounted on
/dev/vdb         2005688  3096   1880992   1% /mnt
we see here that it is still 2 GB!. This is due to the fact that the filesystem has not been touched by the resize operation: the volume service of the cloud has no knowledge of what’s inside your volume.
To use the new space we need to resize the filesystem, obviously from inside the VM, to let it span all the volume:
ubuntu@maz03:~$ sudo umount /mnt
ubuntu@maz03:~$ sudo resize2fs /dev/vdb
resize2fs 1.42.9 (4-Feb-2014)
old_desc_blocks = 1, new_desc_blocks = 1
The filesystem on /dev/vdb is now 1052160 blocks long.

ubuntu@maz03:~$ sudo mount /dev/vdb /mnt
ubuntu@maz03:~$ df -k /mnt
Filesystem     1K-blocks  Used Available Use% Mounted on
/dev/vdb         4078888  4120   3873956   1% /mnt
You can now see you have all the 4 GB available.
13.6. Automatically remount volumes on reboot
Connecting a volume to your VM using the ‘mount’ command is a one-shot solution. If you need to reboot your VM for some reason you will have to re-issue the command again.
Forget to do so might cause the following:
You write data under the /mnt directory (or wherever you mount your volume) thinking you are writing on your volume with, say, 1 TB of space;
The volume is not mounted there so you are writing instead on the same space where your operating system lives;
You eventually fill up your filesystem and your VM crash/starts malfunctioning;
Your VM might not boot anymore and you have to call for help.
We will now create an entry on the /etc/fstab file to remount the volume upon reboot.
Warning
A big warning! The /etc/fstab file is essential for any linux system. Scrambling its contents with incorrect mount options, syntax errors and the like can prevent your VM from booting. Always proceed with caution and try everything from the command line before writing something inside the file and reboot the VM.
The /mnt directory is normally used as the ‘mount point’ for various devices. Normally you would create a directory under /mnt for each device and attach the device on that directory. Obviously this is not mandatory: you can mount filesystems almost everywhere (e.g. /data, /opt/myprograms and so on.)
All the operations will be performed as the supersuser.
Acquire root privileges
ubuntu@maz03:~$ sudo su -
root@maz03:~#
Create the ‘mount point’
root@maz03:~# mkdir -p /mnt/volume1
It is strongly advisable you create a label on the volume as showed in Using (attaching) a Volume
root@maz03:~# e2label /dev/vdb MYDATA
Try it! Especially if you plan to put some options (e.g. -o user,… ). Whatever the command…
root@maz03:~# mount LABEL=MYDATA /mnt/volume1
…should give no errors.
root@maz03:~# mount | grep volume1
/dev/vdb on /mnt/volume1 type ext4 (rw,relatime)
If everything is ok you can safely edit the /etc/fstab file. We will use the ‘nano’ editor for that:
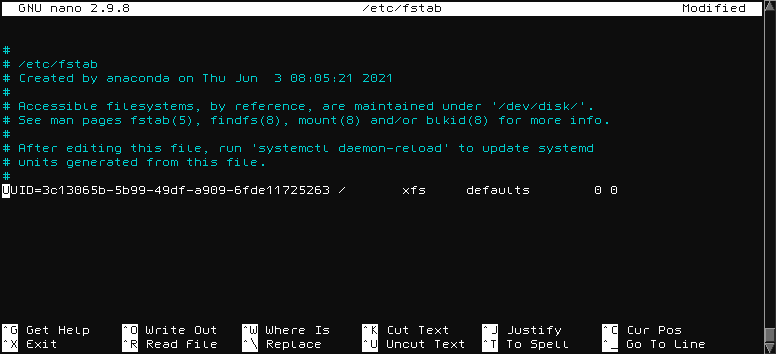
root@maz03:~# nano /etc/fstab
Your screen should look like this one:
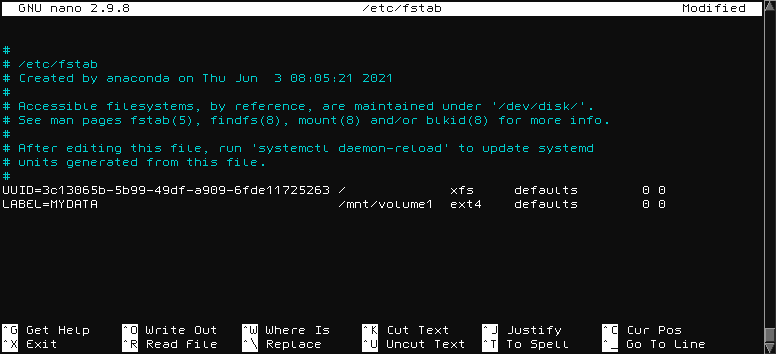
Add a line telling you want to mount the device with label
MYDATAunder/mnt/volume1(we suppose the volume has an ext4 filesystem and you didn’t add any option.This should be the content of your file:
Write your file to disk by pressing
CTRL+o… … and confirming with enter.
Exit the editor by pressing
CTRL+x.Double check the file is valid. Please don’t skip this passage.
If you previously tried to mount the volume just unmount it first (if you didn’t just skip this step):
root@maz03:~# umount /mnt/volume1
Try to mount everything you put in the /etc/fstab:
root@maz03:~# mount -av
/                        : ignored
/mnt/volume1             : successfully mounted
Go back to your normal user by issuing the ‘exit’ command or by pressing
CTRL+d
Now your volume will appear under the ‘/mnt/volume1’ directory everytime your VM boots up. You can also mount the volume anytime just issuing
sudo mount /mnt/volume1
The system will lookup in /etc/fstab and mount the correct volume corresponding to the /mnt/volume1 mount point.
13.7. Specific instructions relevant for INFN-Padova and Physics Dept. users
In this section we discuss about some specific topics relevant only for INFN-Padova users.
13.7.1. Install Mathematica
INFN-Padova and Physics Dept. users can follow these instructions to install Mathematica on their Linux box.
First of all mount on your VM the directory where the installation kit is available. As root:
mount hellgate.pd.infn.it:/sw/linux /mnt
For Ubuntu systems:
sudo mount hellgate.pd.infn.it:/sw/linux /mnt
Go to the relevant directory and launch the installer. As root:
cd /mnt/Mathematica/<version>/Installer

./MathInstaller
For Ubuntu systems:
cd /mnt/Mathematica/<version>/Installer

sudo ./MathInstaller
The installer will ask the target installation directory (the default is /usr/local/Wolfram/Mathematica/<version>) and the directory where the executables will be linked (default /usr/local/bin).
Finally create the file /usr/local/Wolfram/Mathematica/<version>/Configuration/Licensing/mathpass with the following content:
!mathlm.pd.infn.it
That’s all! You can now umount the /mnt directory:
cd ; umount /mnt