10. Container-as-a-Service (CaaS) Platform (EXPERIMENTAL)
Container-as-a-Service provides an easy way to run containerized software packages in the cloud. Unlike the more widely recognized Kubernetes-as-a-Service (KaaS) model, where users are responsible for creating and managing their Kubernetes clusters, with CaaS we offer a fully managed orchestration platform as a cloud service. This means you don’t need an in-depth understanding of Kubernetes infrastructure management. Instead, you can effortlessly deploy your containers to our Kubernetes-based platform using the straightforward kubectl command line interface.
Important
Please be aware that our CaaS service is currently in an experimental phase, so some issues may arise. If you encounter any problems, we kindly ask you to report them to support@cloudveneto.it. Your feedback is invaluable for enhancing the quality of our service.
10.1. Overview
Before accessing the platform, it is important to grasp some key concepts about the architecture, usability, security, and a few limitations. We assume that you already have a basic understanding of Kubernetes.
10.2. OSNodes vs Nodes
Please note that in this guide, we use the terms OSNode and Node. They both refer to the same concept, which is the Kubernetes node, but with some distinctions:
OSNode stands for OpenStackNode and pertains to our API for creating Kubernetes nodes as Virtual Machines within an OpenStack Cloud Infrastructure, as provided by CloudVeneto;
On the other hand, when we mention Node, we are referring to a Kubernetes node where the Pods run. These nodes can be instantiated either through the OSNode API or by using different tools and methods.
10.3. Architecture
Kubernetes efficiently manages your workloads by deploying containers within pods, which are then scheduled to operate on nodes. In our CaaS, each node essentially represents a virtual machine provided within the CloudVeneto infrastructure. We refer to these nodes as OSNodes, which are within your administrative control but are configured by our platform. In contrast, the control plane, responsible for orchestrating container deployments and managing the cluster, is completely managed by CloudVeneto.
This separation of responsibilities ensures a streamlined user experience while providing the following benefits:
Flexibility: You have the freedom to manage your nodes according to your specific requirements in terms of CPU, RAM, and storage (flavor) without to worry about their setup;
Isolation: Your pods run on dedicated nodes, effectively creating a virtual cluster tailored to your needs;
Resource Sharing: You can share one or more nodes with users who belong to your CloudVeneto project;
Service Deployment: You can either use pre-deployed services (e.g., nginx) or deploy new ones in your own namespace.
Please note that the OSNodes you create utilize the quota assigned to your CloudVeneto project. Therefore, the size of your virtual cluster is constrained by the available resources at any given moment. Since node creation typically takes just a few minutes (usually less than 5 minutes), we encourage you to create new nodes as needed but also to promptly remove them when they are no longer necessary in order to conserve cloud resources.
10.4. Security
Running pods on your own OSNdes ensures a high level of isolation. However, Kubernetes doesn’t provide complete isolation for users within the same namespace. To address this specific limitation, we have introduced integrated add-ons for Kubernetes. These enhancements include authentication with Keystone, along with refined authorization procedures to ensure comprehensive user and resource isolation.
Note
Kindly be aware that pods running on shared nodes do not achieve full isolation as they share the same computing resources (virtual machine) and rely on the security capabilities of the container runtime, such as Docker or Containerd.
10.5. Accessing the CaaS
Since our CaaS is built on Kubernetes, accessing the platform requires the correct configuration of kubectl, the Kubernetes management client. For simplifying this configuration process, CloudVeneto has developed a new plugin for kubectl: kubectl-openstack. This plugin set up the kubeconfig file with the appropriate authentication method for Keystone (OpenStack).
10.6. Configuring kubectl with the kubectl-openstack plugin
This section explains how to install and configure our plugin.
10.6.1. Prerequisites
10.6.2. Plugin installation
Download kubectl-openstack (linux version), then make the file executable using the command ‘chmod 755 kubectl-openstack’, and finally, copy it to the directory ‘/usr/local/bin/.
10.6.3. Usage
To view the syntax and the list of parameters use the help:
$ kubectl-openstack --help
Usage: kubectl-openstack [FLAG] -user=<USERNAME> -password=<PASSOWRD> -project=<PROJECT>

Options:
  -force
        overwrite the existing configuration
  -password string
        your CloudVeneto password
  -project string
        your CloudVeneto project
  -user string
        your CloudVeneto username
The following example configures kubectl selecting CMS as project:
$ kubectl-openstack -user=zangrand@infn.it -password=******** -project=CMS
kubectl configured correctly
After configuring kubectl with the kubectl-openstack plugin, the kubeconfig file (/home/<username>/.kube/config) is either created or updated if it already exists. This file contains the Keystone token and various parameters essential for kubectl to manage authentication.
In scenarios where you belong to multiple CloudVeneto projects, you can utilize the kubectl-openstack command to configure kubectl for all your projects seamlessly.
Now you can access the CaaS:
$ kubectl get pods
No resources found in cms namespace.
10.7. How to Create and Manage OSNodes
In this section we explain how to create and manage your OSNodes.
10.7.1. Prerequisites
Before you can create and manage OSNodes in Kubernetes, make sure you have completed the following prerequisites:
Ensure that your kubectl is correctly configured with the kubectl-openstack plugin.
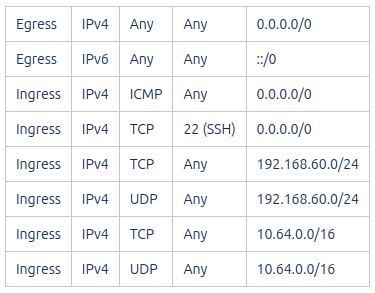
Verify the existence of the ‘K8S’ security group in the CloudVeneto project with the following rules, or create it if missing:
10.7.2. Creating a new OSNode
To create a new OSNodes in your Kubernetes cluster, you’ll use kubectl, the standard Kubernetes command-line interface. Specifically, you will utilize the kubectl apply command, which takes a YAML file as input.
The YAML file required to create a new OSNode should follow this structure:
---
apiVersion: osnode.infn.it/v1
kind: OpenStackNode
metadata:
  name: NODE_NAME
spec:
  flavor: FLAVOR_NAME
  keyPair: KEYPAIR_NAME
  policy: [shared | private ]
NODE_NAME: <Unique node name>
FLAVOR_NAME: <CloudVeneto flavor name>
KEYPAIR_NAME: <User-defined SSH keypair name>
shared | private: <Choose one: shared or private>
Important
Kindly be aware that pods running on shared nodes do not achieve full isolation as they share the same computing resources (virtual machine) and rely on the security capabilities of the container runtime, such as Docker or Containerd. Pods running on shared nodes could be accessed by the node’s owner.
In the following example, we request the creation of two OSNodes (osn-01 and osn-02), the first being shared and the second private, with different flavors (cloudveneto.medium and cloudveneto.large). Both nodes use the same SSH keypair (my-key):
$ cat osnode.yml
---
apiVersion: osnode.infn.it/v1
kind: OpenStackNode
metadata:
  name: osn-01
spec:
  flavor: cloudveneto.medium
  keyPair: my-key
  policy: shared

---
apiVersion: osnode.infn.it/v1
kind: OpenStackNode
metadata:
  name: osn-02
spec:
  flavor: cloudveneto.large
  keyPair: my-key
  policy: private
Copy and paste the above yaml code into an empty (osnode.yml) file, then execute the following command:
$ kubectl apply -f osnode.yml
openstacknode.osnode.infn.it/osn-01 created
openstacknode.osnode.infn.it/osn-02 created
10.7.3. Verifying the OSNode status
To check the status of one or more OSNodes in your Kubernetes cluster, you can use the following commands:
To list all OSNodes and their basic information:
$ kubectl get osn
NAME     PHASE     OWNER                 NODE ID                POLICY    PROVIDER      VM IPV4        AGE
osn-01   Running   zangrand-at-infn.it   osn-01-1696949601872   shared    CloudVeneto   10.64.53.91    13d
osn-02   Running   zangrand-at-infn.it   osn-02-1696949605128   private   CloudVeneto   10.64.53.251   13d
Please note that each OSNode has a Kubernetes Node associated to it (e.g. osn-01 -> osn-01-1696949601872).
To list all OSNodes with additional details, including flavor, status, and IP address:
$ kubectl get osn -o wide
NAME     PHASE     OWNER                 NODE ID                POLICY    PROVIDER      VM FLAVOR            VM STATUS   VM IPV4        AGE
osn-01   Running   zangrand-at-infn.it   osn-01-1696949601872   shared    CloudVeneto   cloudveneto.medium   ACTIVE      10.64.53.91    13d
osn-02   Running   zangrand-at-infn.it   osn-02-1696949605128   private   CloudVeneto   cloudveneto.medium   ACTIVE      10.64.53.251   13d
To view detailed information about a specific OSNodes (replace osn-01 with the desired OSNodes name):
$ kubectl get osn -o wide osn-01
NAME     PHASE     OWNER                 NODE ID                POLICY    PROVIDER      VM FLAVOR            VM STATUS   VM IPV4        AGE
osn-01   Running   zangrand-at-infn.it   osn-01-1696949601872   shared    CloudVeneto   cloudveneto.medium   ACTIVE      10.64.53.91    13d
10.7.4. Removing OSNodes
To remove one or more OSNodes and their associated Virtual Machine from CloudVeneto, use the following command:
$ kubectl delete osn <node_name_1> <node_name_2> ...
For example, to remove osn-01 and osn-02, you would run:
$ kubectl delete osn osn-01 osn-02
openstacknode.osnode.infn.it "osn-01" deleted
openstacknode.osnode.infn.it "osn-02" deleted
10.7.5. Geeting details about your OSNode
For more detailed information about your OSNodes, you can use the following command:
$ kubectl describe osn qst-gpu-01
# kubectl -n qst describe osn qst-gpu-01
Name:         qst-gpu-01
Namespace:    qst
Labels:       SECRET=bootstrap-token-mqkldv
              osn.infn.it/projectid=55158de200964f7c8aa5ca486e6cb7ea
              osn.infn.it/projectname=QST
              osn.infn.it/userid=2ddd446e119b417791492e950553a055
              osn.infn.it/username=zangrand-at-infn.it
Annotations:  <none>
API Version:  osnode.infn.it/v1
Kind:         OpenStackNode
Metadata:
  Creation Timestamp:  2023-09-27T16:22:29Z
  Finalizers:
    openstacknode/finalizer
  Generation:        2
  Resource Version:  3897894
  UID:               e29c8c4c-4f50-49ad-91bc-b6c491bcc42a
Spec:
  Availability Zone:  nova
  Flavor:             cloudveneto.50cores249GB25GB+500GB1A
  Image:
    Id:
    Name:    almalinux9-k8s-node-26-09-2023
  Key Pair:  Lisa
  Policy:    shared
  Provider:  cloudveneto
  Region:    regionOne
  Security Groups:
    K8S
  User Data:
Status:
  Created:      2023-09-27T16:29:51Z
  Description:  The node is running
  Nodeid:       qst-gpu-01-1695831749722
  Phase:        Running
  Server:
    Created:  2023-09-27T16:22:32Z
    Id:       ac4a4470-4469-4ed7-8520-db9ea8c0b56d
    ipv4:     10.64.51.42
    Name:     qst-gpu-01
    Status:   ACTIVE
    Updated:  2023-10-09T11:35:37Z
  Updated:    2023-10-09T11:35:37Z
Events:       <none>
This can be particularly useful for troubleshooting purposes.