2. Registration, User and Project Management
To be able to use the CloudVeneto service, first of all you need to apply for an account. The procedure to be followed is described in this chapter.
Note
Users who need to use INFN IT resources in CloudVeneto must met the prerequisites specified in the following section before applying for an account on the CloudVeneto infrastructure. This always applies to users willing to be member of an INFN project, but also to some Unipd projects which use some INFN resources (e.g. the network).
This does NOT mean that you need to have multiple accounts to access multiple projects: if you already have a Unipd account, once you are compliant with the INFN rules you can ask to be affiliated to INFN projects (as explained in Apply for other (new or existing) projects) with that account.
2.1. Prerequisites for using INFN resources
There are some specific requirements for the use of INFN resources in CloudVeneto. Users who need to use INFN IT resources must:
have a verified digital identity (LoA2) on INFN-AAI;
declare to have read and accepted the INFN rules for the use of IT resources;
have followed the “Corso di Sicurezza Informatica - BASE”.
To have a verified digital identity, connect to https://signup.app.infn.it/ to self-register and to get an account on INFN-AAI. Documentation (unfortunately only in Italian) on this process is available here.
After this self-registration process, connect to the INFN-AAI User Portal at https://userportal.app.infn.it/ using your INFN-AAI account to complete the digital identity registration. In this process you will have to choose where (the INFN site) you want to be identified, and the person that will have to approve your request (if you are a Unipd student and you can’t find your Professor among the proposed list of persons, please select ‘Giannina Borgato’).
Documentation (unfortunately only in Italian) on this process is available here.
You will then be contacted by an INFN secretariat person for your identification.
To follow the “Corso di Sicurezza Informatica - BASE”, please use this link. This course must be followed within 30 days after the registration in INFN-AAI.
Note
These rules apply to users willing to be member of an INFN project, but also to users who want to join a Unipd Physics Dept. related project using a 10.64.x.0/24 network (since this is a network managed by INFN).
2.2. Apply for an account
The registration procedure in the cloud is managed through the web service interface.
Go to https://cloud-areapd.pd.infn.it/dashboard or https://cloudveneto.ict.unipd.it/dashboard in a browser. The following page should appear:
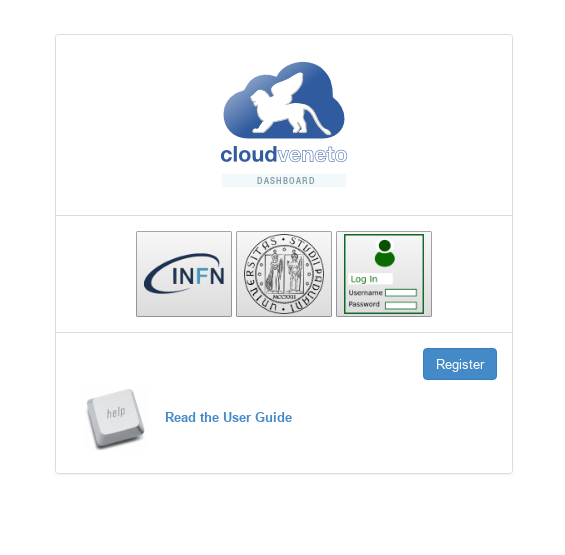
Click on the Register button.
The following page should appear:
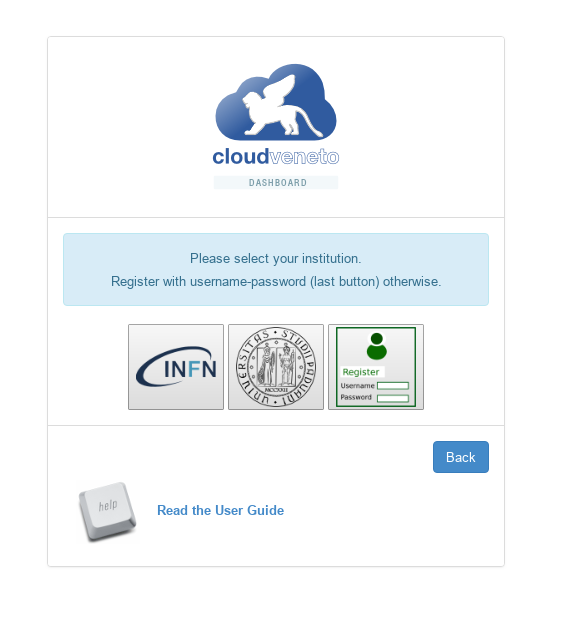
If you have an account on the INFN Authenticaton and Authorization Infrastructure (INFN AAI), click on the INFN AAI logo and proceed with Enrollment procedure through INFN AAI or UniPD SSO. You will have also to be compliant with the rules for the use of INFN resources, discussed in Prerequisites for using INFN resources.
If you instead have an account on the UniPD Single Sign-On (SSO) Infrastructure (e.g. you have a @unipd.it or @studenti.unipd.it email), click on the UniPD logo and proceed with Enrollment procedure through INFN AAI or UniPD SSO.
If and only if you don’t have neither an account on the INFN Authenticaton and Authorization Infrastructure (INFN AAI) nor on the UniPD SSO, click on the last icon (the green one, with “Username” and “Password”) and proceed with Apply for an account using User and Password.
2.2.1. Enrollment procedure through INFN AAI or UniPD SSO
Once authenticated on your Identity Provider system, you will be redirected to a form like this:
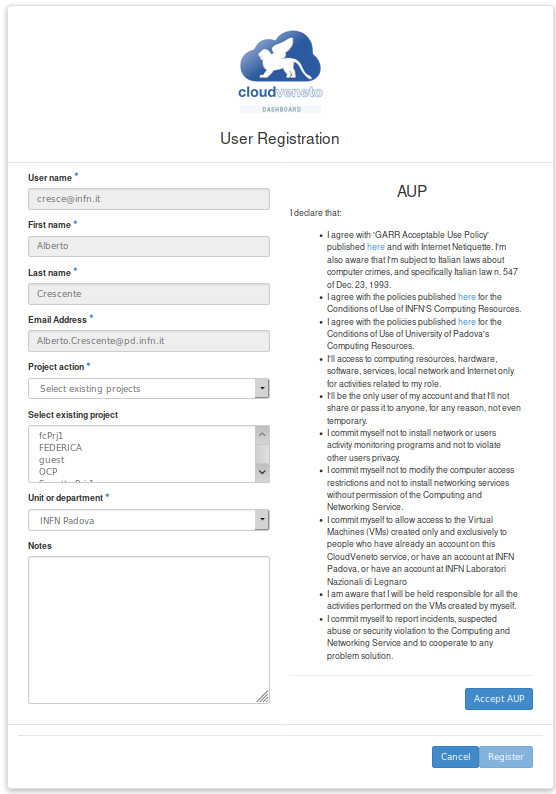
Most of the fields are automatically filled in by the Identity Provider system. Fill in the form with the required information left.
For what concerns the Project Action (projects have been discussed in Projects) you have two options:
Select Existing Projects
Create new project
Choose Select Existing Projects if you want to apply membership for one or more existing projects (choose them in the relevant box).
Select Create new project if instead you want to ask the creation of a new project (and you are the leader of the experiment/research group associated to this project). In this case you will have to specify also:
the Project name
a short Project Description, up to 500 characters
the Project expiration date
the name of a contact person, responsible for the project, or a supervisor
the home institution and the department that the project must belong to
Newly created projects will get a default quota of:
20 VCPU
20 GB RAM
200 GB for Volume (e.g. non ephemeral) storage
Allocation of more resources for UniPD users must be approved by the Cloud UniPD “governance”. Mail your request to cloud-unipd-gov@lists.pd.infn.it if you want more resources to be allocated to your project.
Note
The person who asks for the creation of a new project is automatically defined as the manager of this project, i.e. he/she will have to manage the membership requests for this project. So the request to create a new project should be done by the relevant experiment/group leader.
When you have filled the form, please read the AUP that you need to accept (by clicking the Accept AUP button).
Finally click on the Register button and you are done.
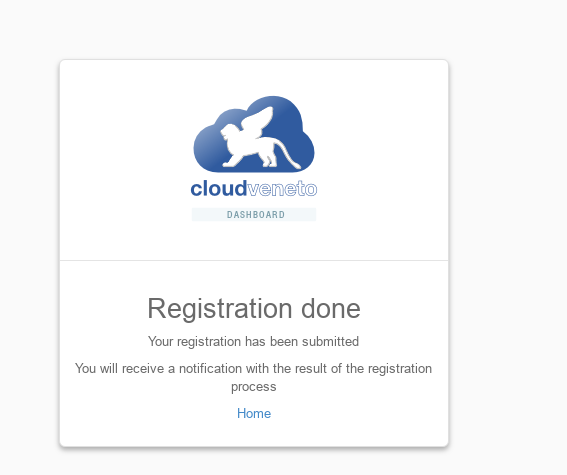
Your request will be managed by the Cloud adminstrator and by the manager(s) of the project(s) for which you applied membership. You will get an e-mail when your request is approved or if for some reason your request is refused. In the first case you will later also receive an e-mail with the credentials needed to access the Cloud gate machine (see Network Access).
2.2.2. Apply for an account using Username and Password
If and only if you don’t have an account on the UniPD SSO or INFN AAI, click on the green icon on the right:

A form such as the one of the following image will appear.
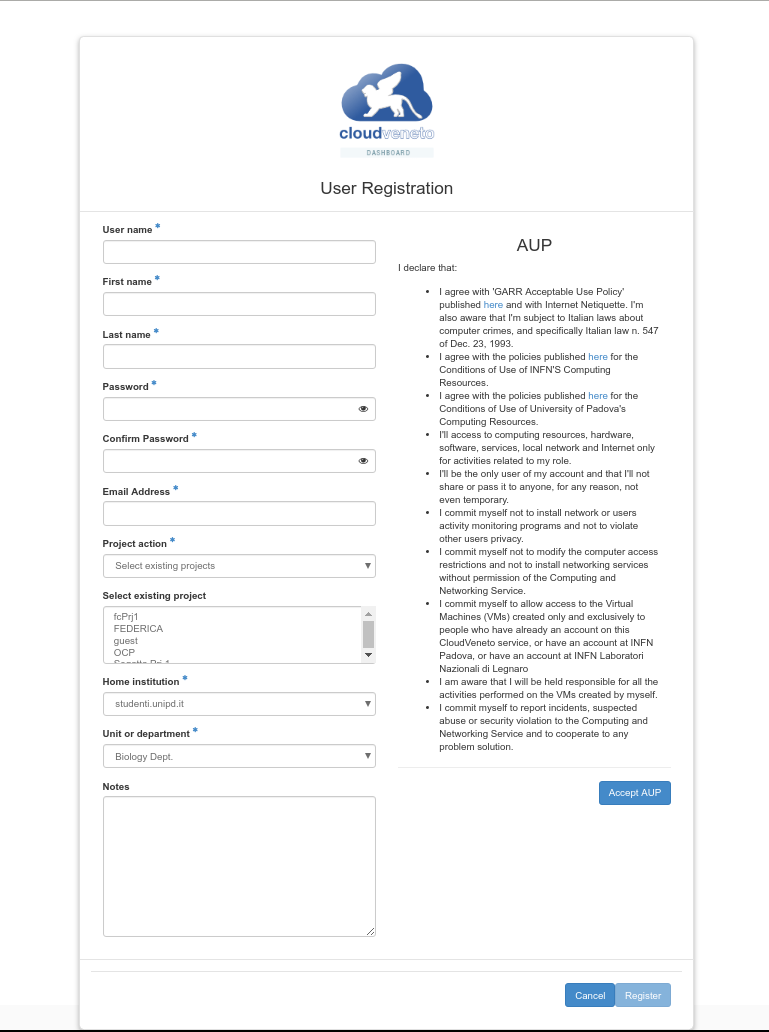
Please fill in the form with your personal data (First Name, Last Name, Email Address). Choose a User name (please note that it could be changed by the Cloud admins during the registration process) and a Password.
For what concerns the Project Action (projects have been discussed in Projects) you have two options:
Select Existing Projects
Create new project
Choose Select Existing Projects if you want to apply membership for one or more existing projects (choose them in the relevant box).
Select Create new project if instead you want to ask the creation of a new project (and you are the leader of the experiment/research group associated to this project). In this case you will have to specify also:
the Project name
a short Project Description, up to 500 characters
the Project expiration date
the name of a contact person, responsible for the project, or a supervisor
the home institution and the department that the project must belong to
Newly created projects will get a default quota of:
20 VCPU
20 GB RAM
200 GB for Volume (e.g. non ephemeral) storage
Allocation of more resources for UniPD users must be approved by the Cloud UniPD “governance”. Mail your request to cloud-unipd-gov@lists.pd.infn.it if you want more resources to be allocated to your project.
Note
The person who asks for the creation of a new project is automatically defined as the manager of this project, i.e. he/she will have to manage the membership requests for this project. So the request to create a new project should be done by the relevant experiment/group leader.
When you have filled the form, please read the AUP that you need to accept (by clicking the Accept AUP button).
Finally click on the Register button and you are done.
Your request will be managed by the Cloud adminstrator and by the manager(s) of the project(s) for which you applied membership. You will get an e-mail when your request is approved or if for some reason your request is refused. In the first case you will later also receive an e-mail with the credentials needed to access the Cloud gate machine (see Network Access).
2.3. Apply for other (new or existing) projects
After you have been given an account on the CloudVeneto, at any time you can ask the creation of a new project or the membership to an already existing project.
Both operations are performed by accessing the Identity → Projects tab of the OpenStack dashboard and clicking on Subscribe to project as depicted on the following image:
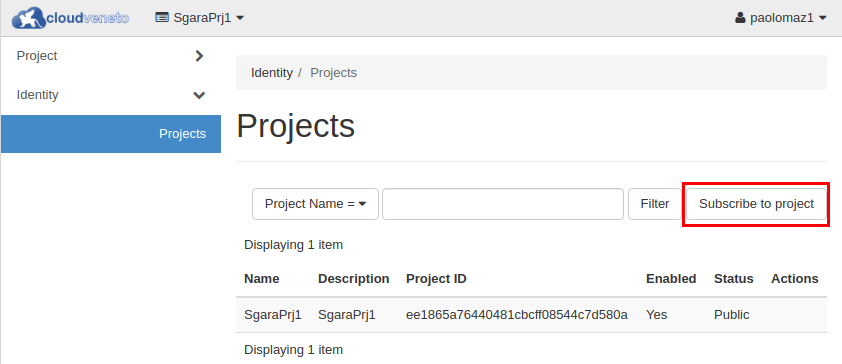
Fulfill your request selecting the relevant choice under the Project action dropdown list.
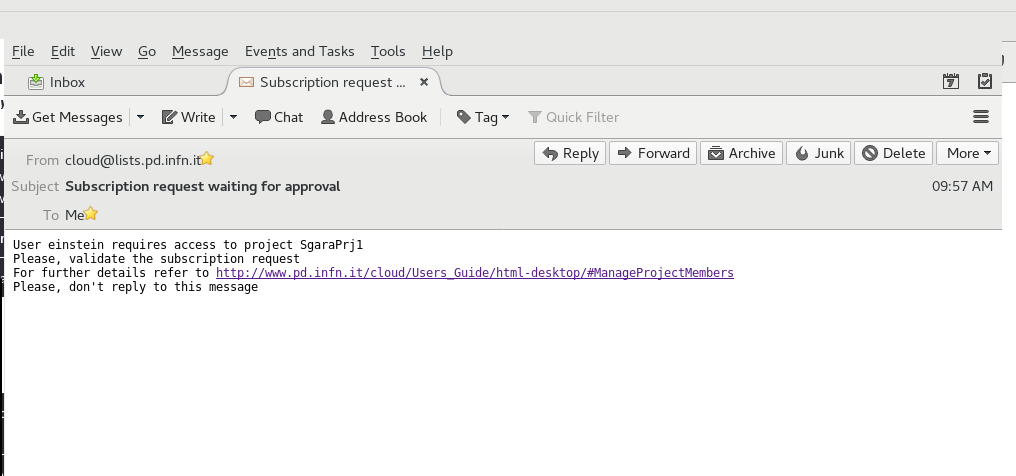
2.4. Manage project membership requests (only for project managers)
If you are the manager of a project, you will receive membership requests for this project. You will have to manage (approving or refusing) such requests.
When a user applies to be member of a project that you manage, you will receive an e-mail such as this one:
To manage such requests, open the OpenStack web dashboard, i.e. go to https://cloud-areapd.pd.infn.it or https://cloudveneto.ict.unipd.it in a browser. Log in, and then access Identity → Subscriptions. An image such as the following one, with the list of the pending requests, will appear.
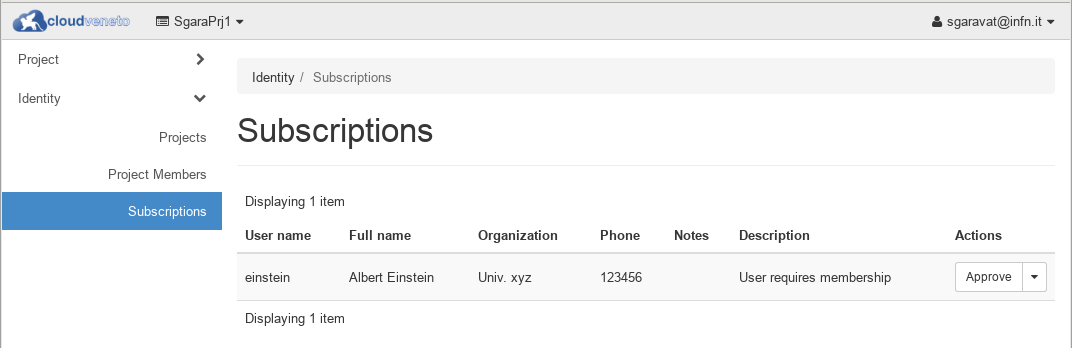
To approve a membership request, click on the Approve button (in Actions). A window such as the following one will appear:
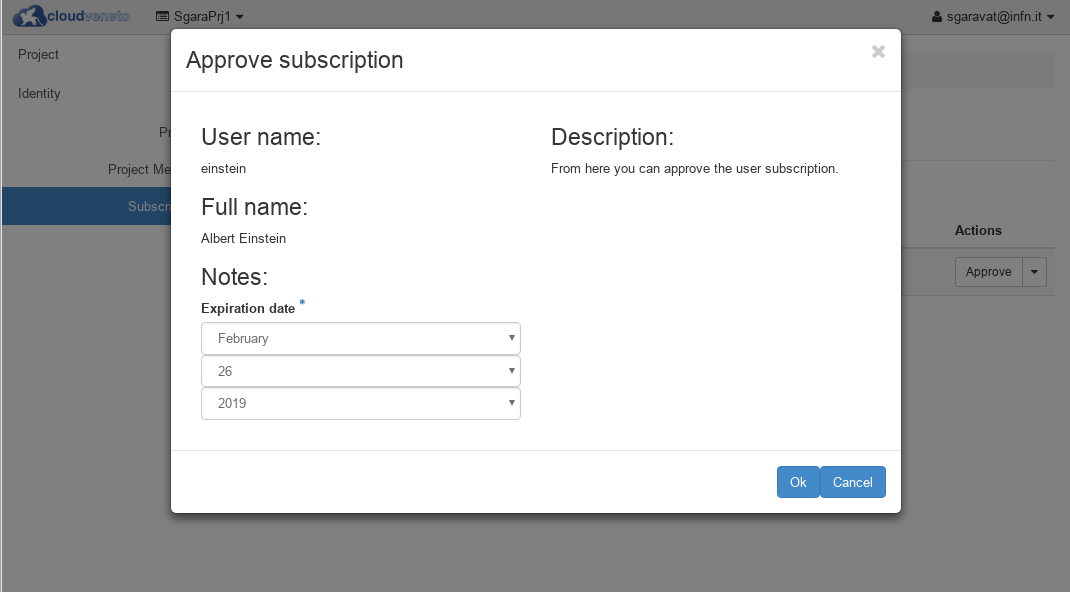
Set the expiration date of the account, and click on the Ok button to approve the request.
If, instead, you want to reject the request, select Reject in Actions.
Note
It is therefore up to the project manager to set the expiration date of the members of his/her group.
A user belonging to multiple projects can have different expiration dates for the different projects he/she belongs to.
2.5. Administer project members (only for project managers)
If you are the manager of a project, you can list the members of your project and, if needed, change their role.
Open the OpenStack web dashboard, i.e. go to https://cloudveneto.ict.unipd.it/dashboard in a browser. Log in using the relevant method and access the Identity → Project Members panel. The list of users affiliated to your project will appear:
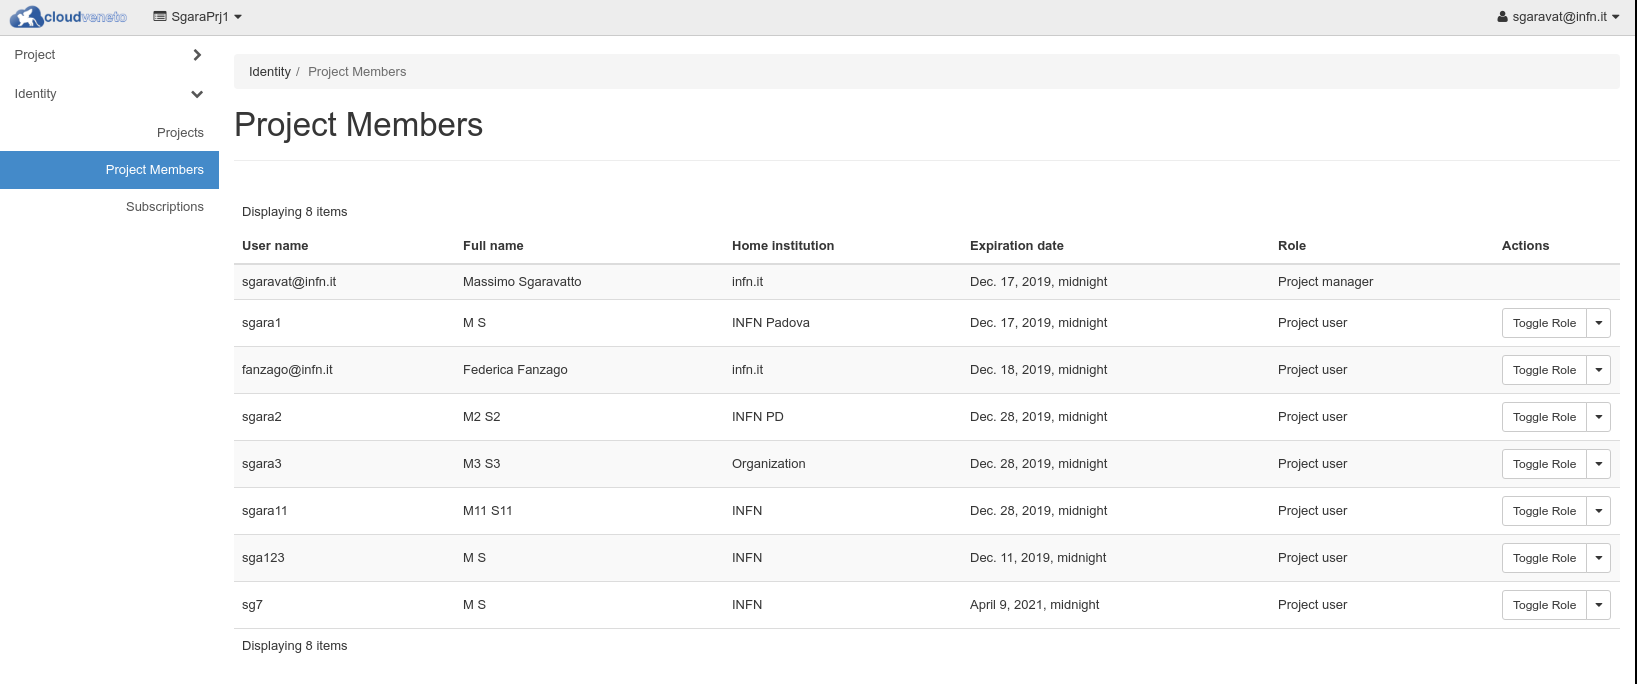
From here you can also manage the role of a specific user. You can ask the promotion of a user to prokect manager by clicking on Propose admin (the request will then have to be approved by the cloud administrators) or you can demote a project manager to project user (by clicking on Demote user).
Note
If a user is promoted to Project manager, she will then be allowed to manage affilitation requests to the project, as described in Manage project membership requests (only for project managers).
From this window you can also remove a specific user from the project you manage, e.g. because he/she doesn’t work anymore in your group.
Important
Please keep your project’s membership list up to date, setting the appropriate expiration date (when a user requests the membership or the renewal), and removing users who no longer work in your group and are no longer entitled to access the resources assigned to your project. Only you (the project manager) have this information. CloudVeneto administrators generally don’t know it.
2.6. Project membership renewal
A user can be affiliated to multiple projects and each affiliation has an expiration date. You can check the expiration dates for the projects you are affiliated opening the OpenStack web dashboard, i.e. going to https://cloud-areapd.pd.infn.it or https://cloudveneto.ict.unipd.it in a browser. Then log in, and access Identity → Projects.
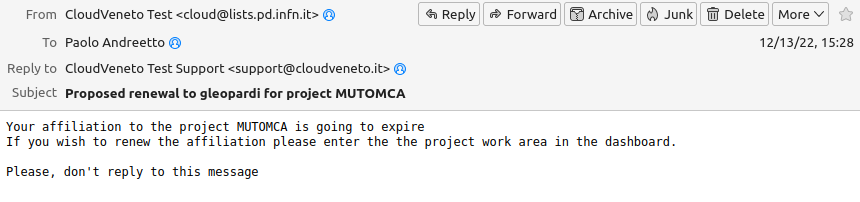
When the membership for a particular project is going to expire, usually 30 days before the expiration, you are invited to decide whether to renew the membership or to cancel it at the due date: you will receive a message from the CloudVeneto site such as this one:
You will then must log into the dashboard and select the related project from the combo on top of the page, if necessary. A page such as this one will appear:
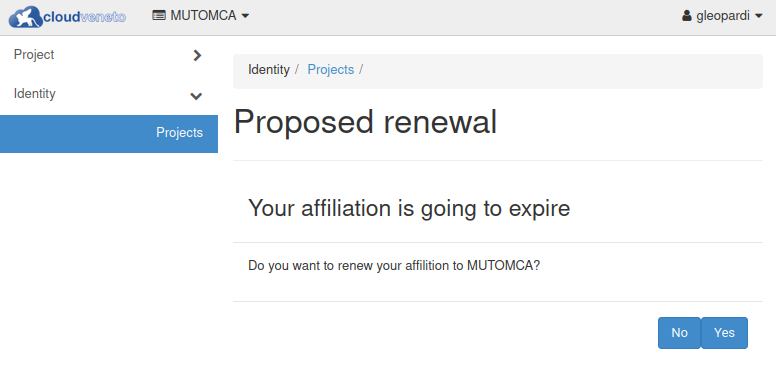
If you click ‘Yes’ (i.e. if you would like to have your membership renewed), the project renewal request will be sent to the project administrator(s) for approval (as documented in the next section).
2.7. Manage project membership renewal requests (only for project managers)
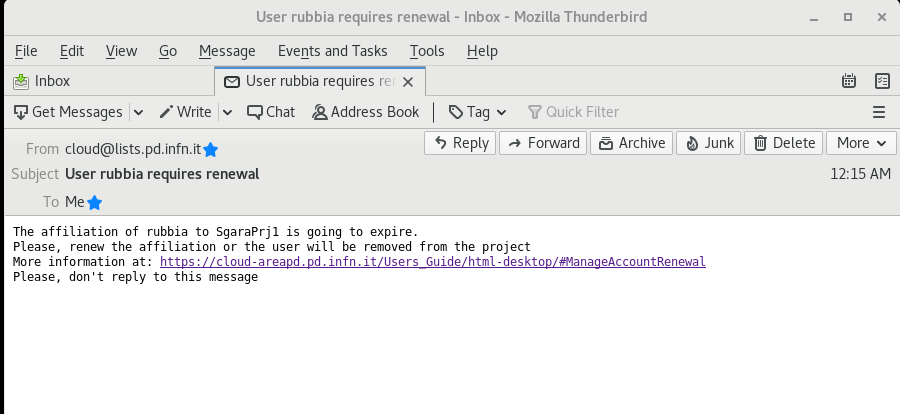
When the affiliation of a user for a project is expiring and that user would like the renewal of such membership (see previous section), as manager of that project you will receive an e-mail such as this one:
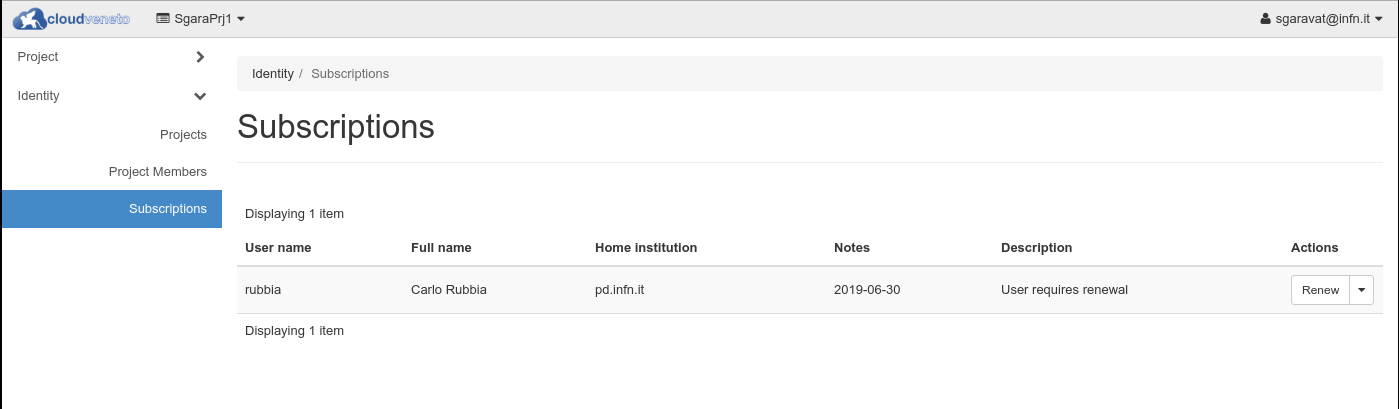
To manage such requests, open the OpenStack web dashboard, i.e. go to https://cloud-areapd.pd.infn.it or https://cloudveneto.ict.unipd.it in a browser. Log in, and then access Identity → Subscriptions. An image such as the following one will appear:
Click on the Renew button (in Actions). A window, such as the one represented in the following image will appear:
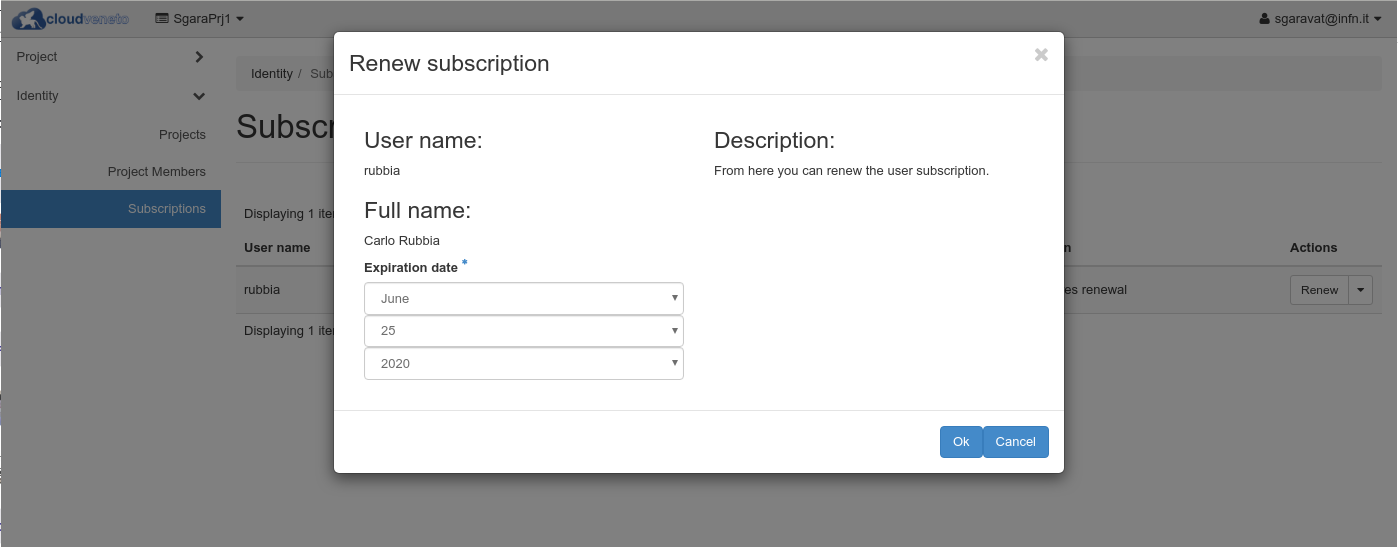
Set the new expiration date and then click the OK button.
Note
Please note that you can change any time the expiration date for the membership of a certain user to the project you are managing. This can be done going in the Dashboard and accessing Identity → Project Membership. Then select Change Expiration in the Actions menu for the relevant user.
2.8. Send a message to project members (only for project managers)
If you are the manager of a project, you can send a message (that will be delivered via e-mail) to all members of your project.
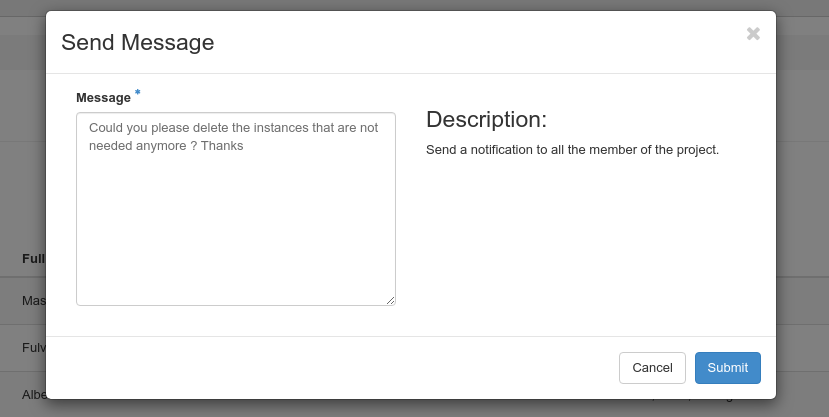
Please go to Identity → Project Members on the left hand menu and click on Send Message.

Fill the ‘Message’ form with the text that you want to send, and then click Submit.
2.9. Expired users
Please note the resources (instances and volumes) owned by expired users (i.e. people who don’t have anymore an account on CloudVeneto) will be removed.
Please also note that, while the ownership of a volume can be transferred from a user to another one (see Transferring the ownership of a volume to another user), this can’t be technically possible for virtual machines.