9. Managing Storage
There are several ways of handling disk storage in the CloudVeneto:
Ephemeral storage exists only for the life of a virtual machine instance. It persists across reboots of the guest operating system but when the instance is deleted so is the associated storage. The size of the ephemeral storage is defined in the virtual machine flavor.
Volumes are persistent virtualized block devices independent of any particular instance. Volumes may be attached to a single instance at a time, but may be detached or re-attached to a different instance while retaining all data, much like a USB drive. The size of the volume can be selected when it is created within the quota limits for the particular project.
Object Storage allows to store and retrieve potentially lots of data with a simple API. It’s built for scale and optimized for durability, availability, and concurrency across the entire data set. Object storage is ideal for storing unstructured data that can grow without bound.
9.1. Ephemeral storage
Ephemeral storage exists only for the life of a virtual machine instance. It persists across reboots of the guest operating system but when the instance is deleted so is the associated storage. The size of the ephemeral storage is defined in the virtual machine flavor.
Among the flavor details (that are listed in the Dashboard when a VM has to be launched or can be seen using the openstack flavor list command), there is an attribute called ‘Ephemeral’. When you use a flavor with an ephemeral disk size different from zero, the instance is booted with an supplementary virtual ephemerak disk (besides the root disk) whose size is indicated by the ‘ephemeral’ value.
Warning
Please note that, when snapshotting or shelving a virtual machine instantiated using a flavor with the supplementary ephemeral disk, the content of such extra disk won’t be saved: only the content of the root disk will be snapshotted.
Please see Flavors with supplementary ephemeral disk for other information related to supplementary ephemeral disk.
Warning
Please note that backups are not performed on ephemeral storage systems.
9.2. Volumes
Volumes are persistent virtualized block devices independent of any particular instance. Volumes may be attached to a single instance at a time, but they may be detached or re-attached to a different instance while retaining all data, much like a USB drive.
Warning
Please note that backups are not performed on volumes.
9.2.1. Create a Volume
The steps to add a Volume are:
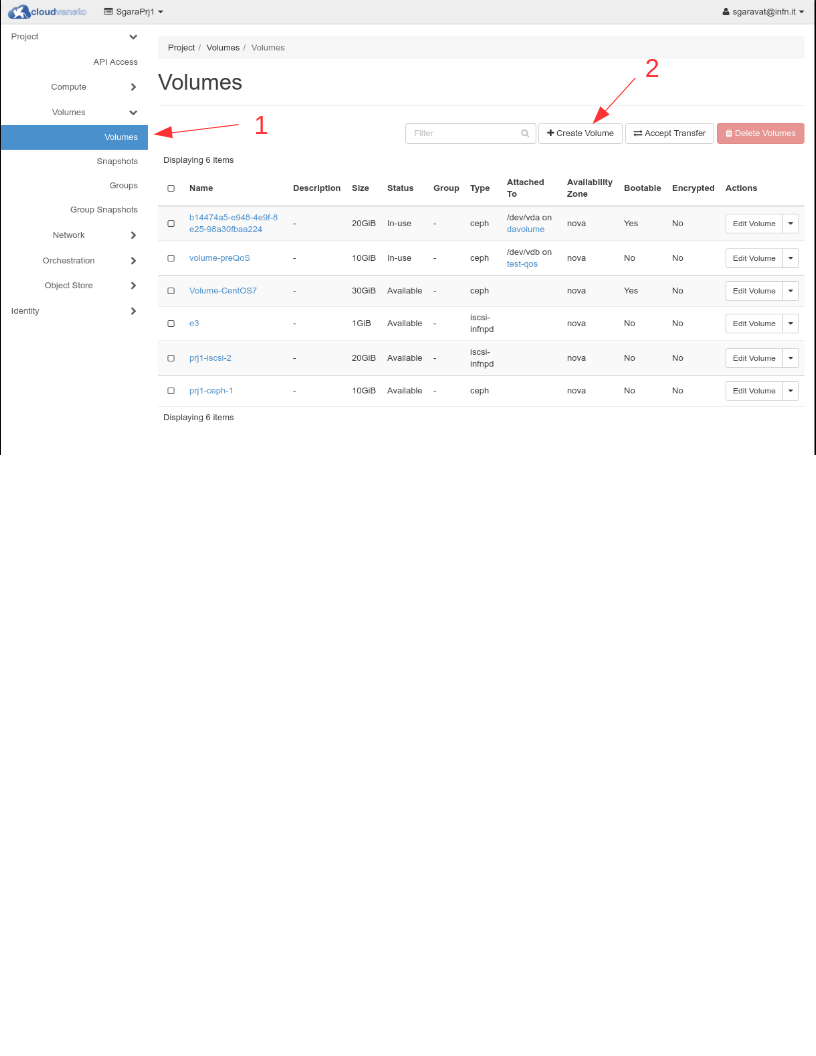
Using the Dashboard, click on Volumes → Volumes and then Create Volume.
In the “Create Volume” window specify the name of the volume (testvol in the example below) and the desired size (12 GB in the example). As Volume Source specify “No source, empty volume”.
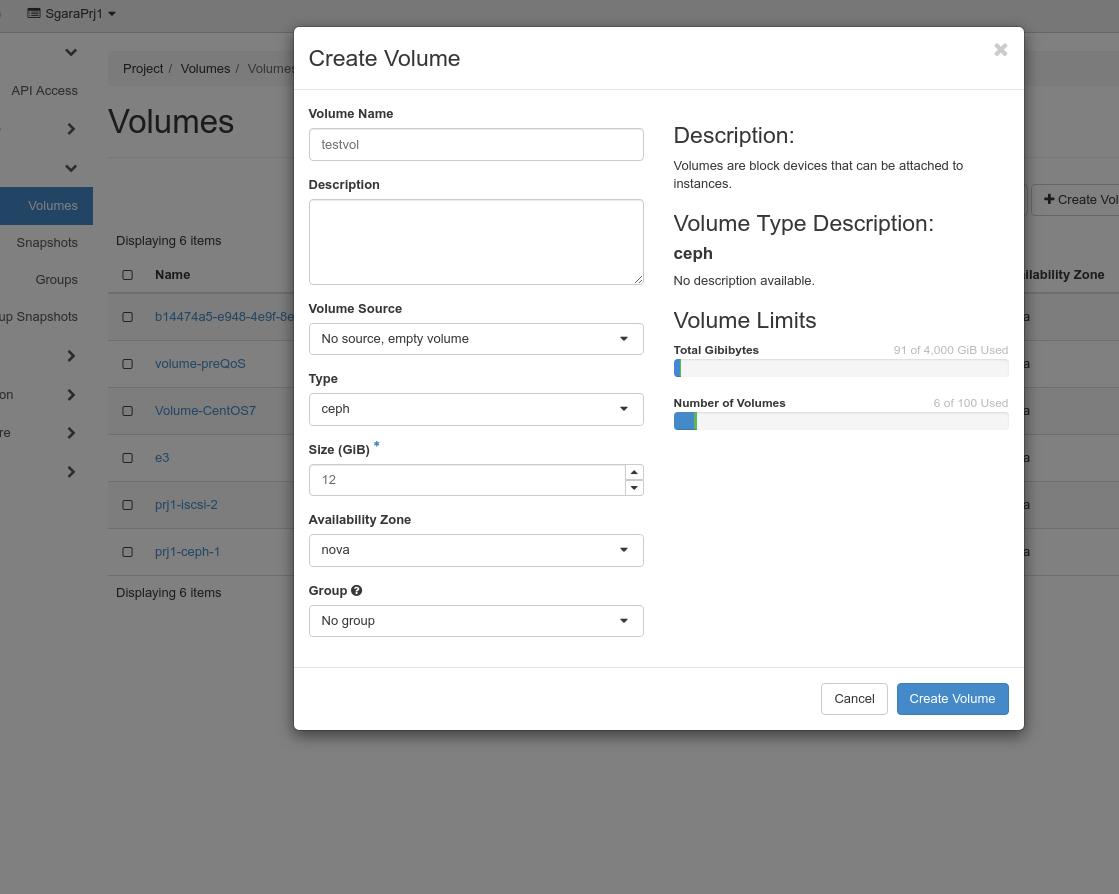
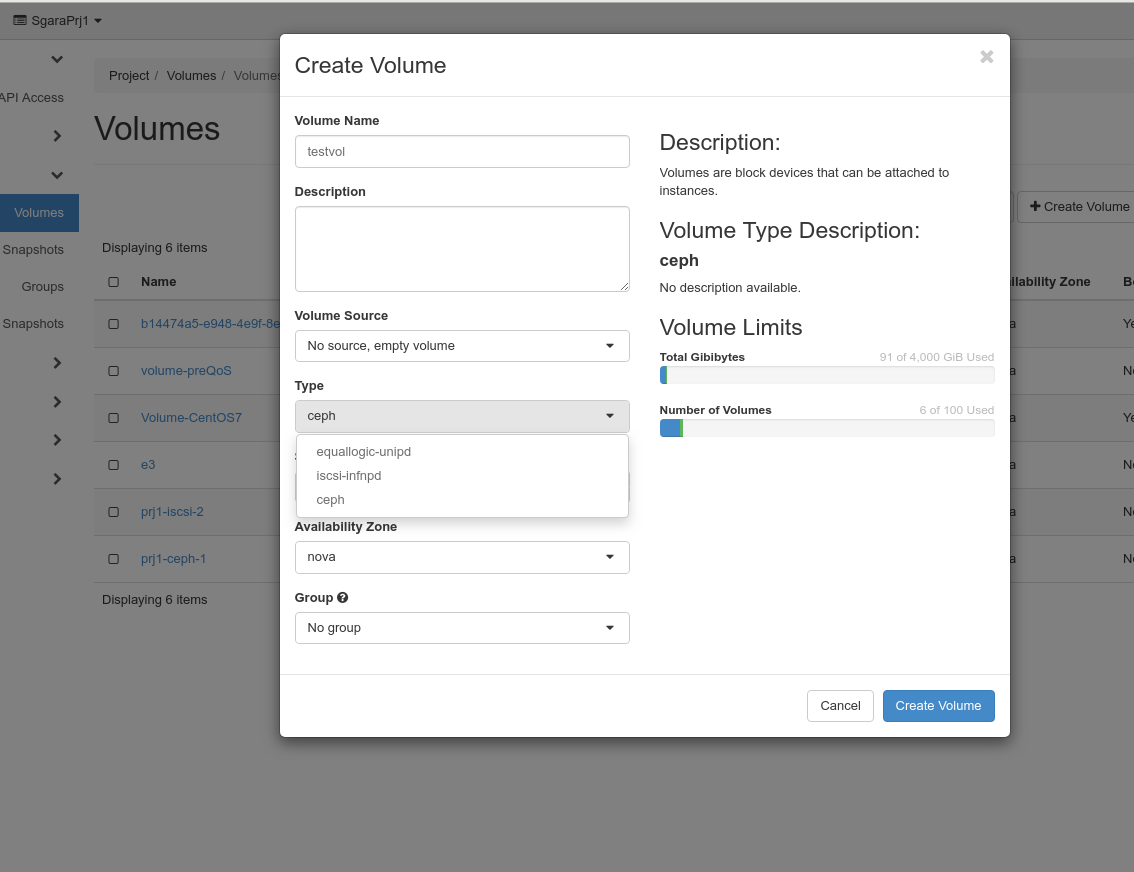
Multiple volume types exist, and you need to specify the type to be used for the volume to be created.
Note
Please select the ceph-ec volume type (the default) unless you have been told by the cloud administrators to use another volume type.
In general different quotas for the different volume types are set.
Unfortunately the OpenStack dashboard shows only the overall quota. To
see the quota per each volume type you need to use the OpenStack CLI (see:
Accessing the Cloud with command line tools)
and run the cinder quota-usage ${OS_PROJECT_ID}
command.
E.g.:
$ cinder quota-usage ${OS_PROJECT_ID}
+----------------------------+--------+----------+-------+
| Type                       | In_use | Reserved | Limit |
+----------------------------+--------+----------+-------+
| backup_gigabytes           | 0      | 0        | 1000  |
| backups                    | 0      | 0        | 10    |
| gigabytes                  | 72     | 0        | 400   |
| gigabytes_ceph             | 48     | 0        | 200   |
| gigabytes_equallogic-unipd | 24     | 0        | 200   |
| per_volume_gigabytes       | 0      | 0        | 5000  |
| snapshots                  | 0      | 0        | 10    |
| snapshots_ceph             | 0      | 0        | -1    |
| snapshots_equallogic-unipd | 0      | 0        | -1    |
| volumes                    | 8      | 0        | 10    |
| volumes_ceph               | 4      | 0        | -1    |
| volumes_equallogic-unipd   | 4      | 0        | -1    |
+----------------------------+--------+----------+-------+
$
In this example the project was given 400 GB. For the ceph and equallogic-unipd volume types the quota is 200 GB.
9.2.2. Using (attaching) a Volume
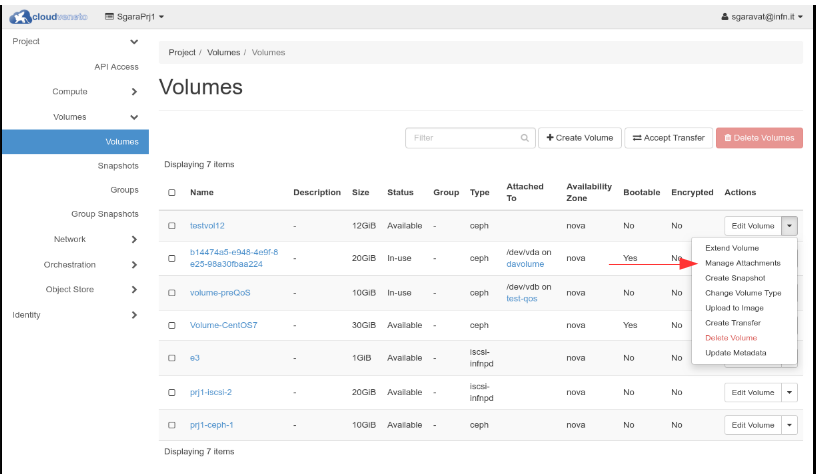
The new defined volume will appear in the Volumes tab.
To attach this volume to an existing instance, click on Actions → Manage Attachments:
Select the relevant Virtual Machine…
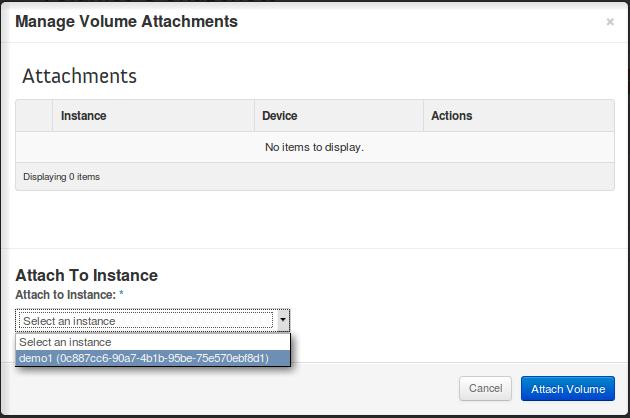
…and click on Attach Volume.
Log in to the instance and check if the disk has been added:
grep vdb /proc/partitions
 253       16   12582912 vdb
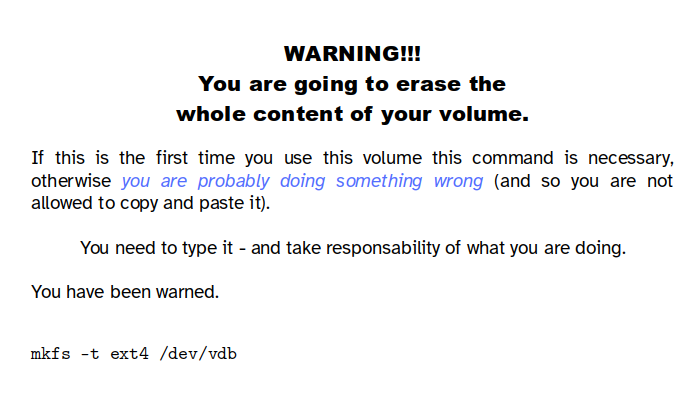
If this is a newly created volume, you might need to create a file system on it. WARNING: this will delete everything (format) on the disk! Do it just the first time you use the volume.
It is advisable to create a ‘label’ on the disk. Use a descripive short name with no spaces (e.g.: MYDATA)
e2label /dev/vdb MYDATA
Mount the volume: if you created a label you can use
mount LABEL=MYDATA /mnt
otherwise use the device name:
mount /dev/vdb /mnt
Note
You can attach only your volumes Please note that you can attach a volume of yours to an instance created by another user of the same project, while you can’t attach a volume created by another user to an instance.
9.2.3. Detaching a Volume
To detach a volume from an instance, first of all log into the virtual machine that has the volume mounted, and unmount it:
umount /mnt
Then, using the Dashboard, click on Volumes, click on Actions → Manage Attachments for the relevant volume and select Detach Volume. The detached volume can then be associated to another VM, as described above (you won’t have to re-create the file system, otherwise you will loose the content of the volume!)
Note
You can detach only your volumes. Please note that you can detach a volume of yours from an instance created by another user of the same project, while you can’t detach a volume created by another user.
Important
Please remember to also disable the automatic mounting of that volume, but deleting the relevant line from the /etc/fstab file.
9.2.4. Deleting a Volume
If a volume is not needed any longer, to completely remove it (note that this step cannot be reverted!):
if needed, detach the volume from the associated instance, as explained in the previous section
using the Dashboard, click on Volumes → Volumes, select the relevant volume and then select Delete Volumes.
9.2.5. Sharing a volume between multiple (virtual) machines
As discussed in Volumes, a volume may be attached to a single instance. However it can be shared with other virtual machines of the Cloud (and/or with other hosts) using NFS. The following explains how this can be done, on a AlmaLinux9 server:
Configure NFS server
Once a volume has been created, formatted and attached to an instance acting as NFS server, create the mount point and mount the volume on this virtual machine:
mkdir /dataNfs
mount /dev/sdb /dataNfs
Ensure that on this virtual machine the packages providing the rpc.nfsd daemon are installed:
# yum whatprovides "*/rpc.nfsd"

Last metadata expiration check: 286 days, 2:02:18 ago on Thu Jul 11 07:31:17 2024.
nfs-utils-1:2.5.4-25.el9.x86_64 : NFS utilities and supporting clients and daemons for the kernel NFS server
Repo        : @System
Matched from:
Filename    : /usr/sbin/rpc.nfsd

nfs-utils-1:2.5.4-25.el9.x86_64 : NFS utilities and supporting clients and daemons for the kernel NFS server
Repo        : baseos
Matched from:
Filename    : /usr/sbin/rpc.nfsd

# yum install nfs-utils
Insert the correct export directive in the /etc/exports file. For example if the volume must be visible in read-only mode to all the virtual machines of the same subnet 10.67.1.* (check the subnet with the ifconfig command) the content of the /etc/exports file will be:
/dataNfs 10.67.1.0/24(ro,no_root_squash)
Note that there are no spaces between the ‘*’ and the ‘(‘.
If the volume must be visible in read-write to all the virtual machines of the same subnet 10.67.1.*, you might export it using the async or sync option. In short: async is much faster wrt sync, but can lead to data corruption if the server crashes during write operations (async means that the NFS server will acknowledge data before it’s committed to disk, while sync does the opposite: the server will only acknowledge data after it’s written out). Sync can be slow in particular when you have to write many files, since the open()/creat() and close() system calls have to wait for the new data to hit disk.
To export a volume using the async option the /etc/exports will be something like:
/dataNfs 10.67.1.0/24(async,rw,no_root_squash)
To export a volume using the sync option the /etc/exports will be something like:
/dataNfs 10.67.1.0/24(sync,rw,no_root_squash)
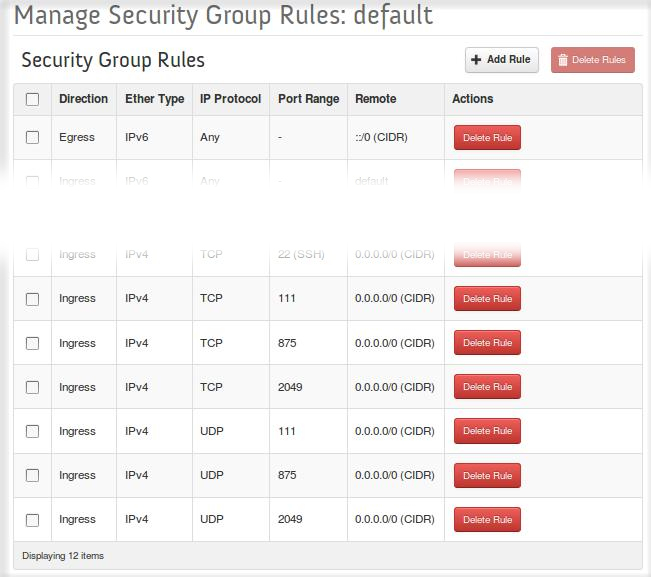
Check the firewall on the virtual machine. Ensure that the other instances have both UDP and TCP access to ports 111, 2049 and 875:
If firewalld is installed and running, issue the following commands:
firewall-cmd --add-service=nfs
firewall-cmd --permanent --add-service=nfs
Check the security group (see Setting security group(s)): access to ports 111, 875 and 2049 (IPv4 Ingress both TCP and UDP) should be guaranteed:
Restart nfs server using:
systemctl restart nfs-server
systemctl enable nfs-server
Configure client machine(s)
To mount the volume on the other VMs, check that the package providing the mount.nfs command is installed:
# yum whatprovides "*/rpc.nfsd"

Last metadata expiration check: 286 days, 2:02:18 ago on Thu Jul 11 07:31:17 2024.
nfs-utils-1:2.5.4-25.el9.x86_64 : NFS utilities and supporting clients and daemons for the kernel NFS server
Repo        : @System
Matched from:
Filename    : /usr/sbin/rpc.nfsd

nfs-utils-1:2.5.4-25.el9.x86_64 : NFS utilities and supporting clients and daemons for the kernel NFS server
Repo        : baseos
Matched from:
Filename    : /usr/sbin/rpc.nfsd

# yum install nfs-utils
issue a mount command such as this one (assuming 10.67.1.4 is the NFS server):
mount -t nfs 10.67.1.4:/dataNfs /mnt
Warning
It is highly suggested that the VM acting as NFS server is instantiated with enough resources (at least 2 VCPUs and 4 GB of RAM). Moreover it should be used only for hosting the NFS server (i.e. it shouldn’t be used for other activities).
9.2.6. Transferring the ownership of a volume to another user
This section explains how to transfer the ownership of a volume to another person, that can possibly be affiliated to another project.
Warning
The volume to be transferred must not be attached to an instance.
The owner of the volume to be transferred should follow the following procedure:
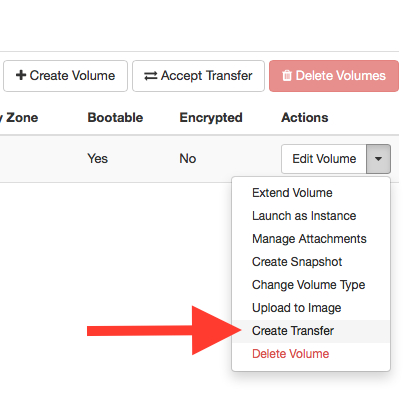
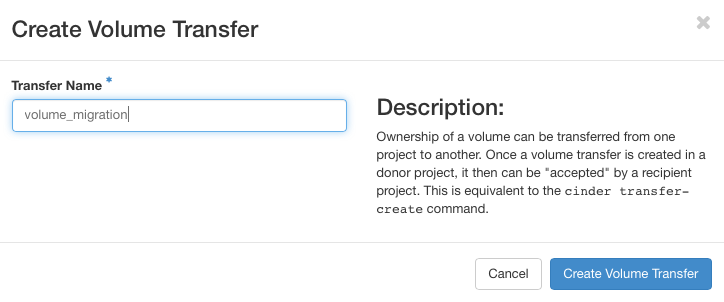
Using the Dashboard, click on Volumes → Volumes. For the volume that you want to transfer, on the right side click on the black dart and choose Create Transfer.
Specify a Transfer Name and click on Create Volume Transfer
Save the Transfer ID and the Authorization Key, or download them.
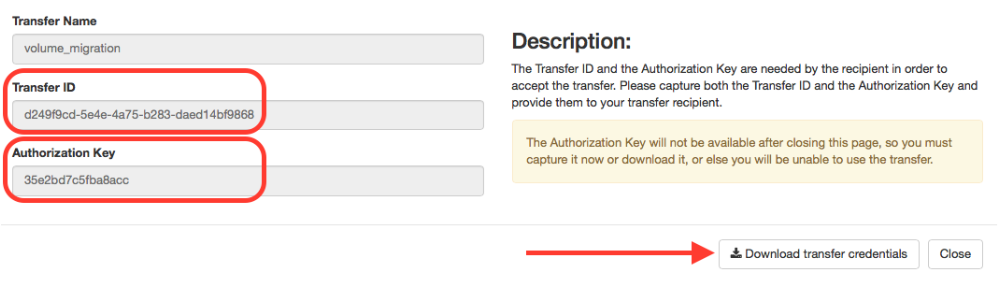
These Transfer ID and the Authorization Key must be communicated to the person who should become the new owner of the volume. Such user must follow the following steps:
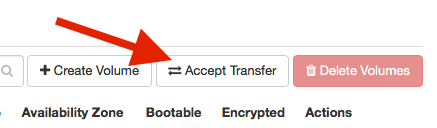
Using the Dashboard, click on Volumes → Volumes, and then click on Accept Transfer.
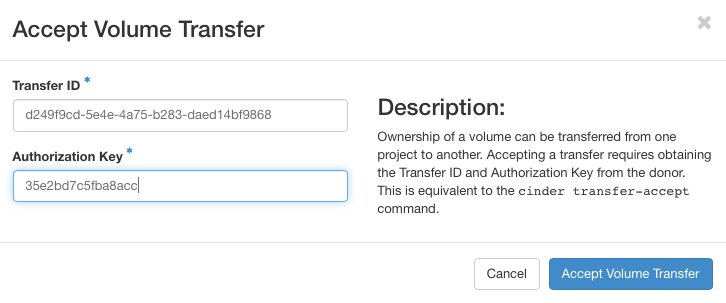
Fill in the Transfer ID and the Authorization Key received from the donor and then click on Accept Volume Transfer.
9.3. Object Storage
CloudVeneto provides also an Object Storage system. Data is stored as objects (which are typically files) which are organized in containers, also called buckets.
The CloudVeneto Object Store is built upon Ceph and supports two interfaces:
S3-compatible: provides object storage functionality with an interface that is compatible with a large subset of the Amazon S3 RESTful API.
Swift-compatible: provides object storage functionality with an interface that is compatible with a large subset of the OpenStack Swift API.
Warning
Please note that backups are not performed on the CloudVeneto object storage.
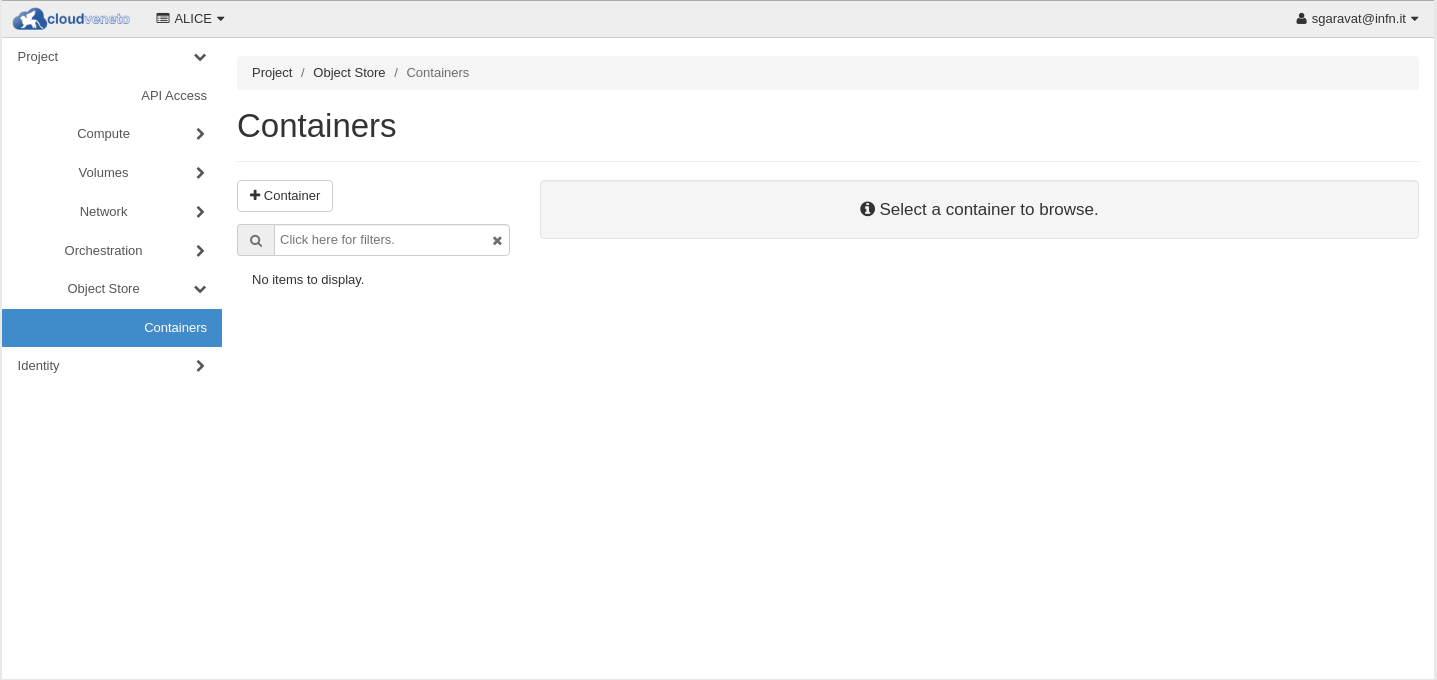
9.3.1. Accessing the object storage using the dashboard
The access to the object storage using the OpenStack dashboard is implemented through the Swift-compatible interface.
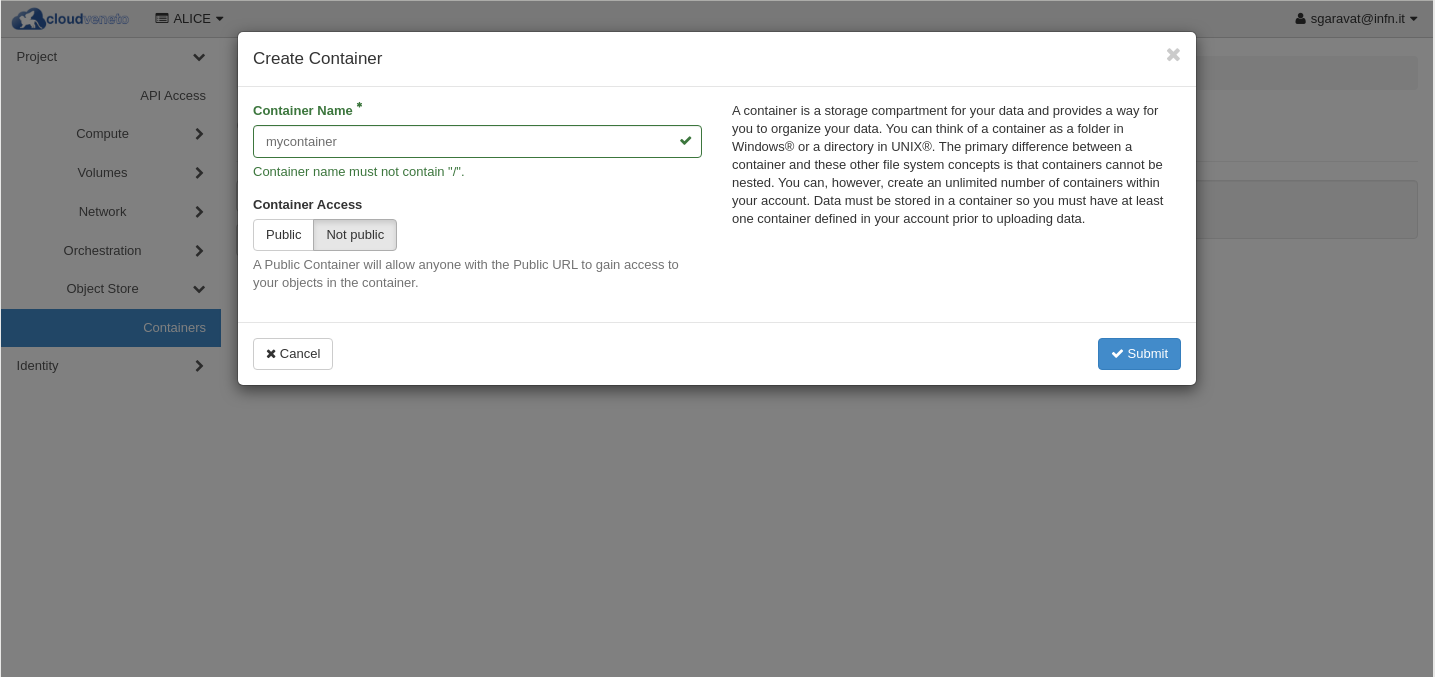
To create a container, using the Dashboard, click on Object Storage → Containers and then click on + Container.
Fill the Container Name field and then click on the Submit button.
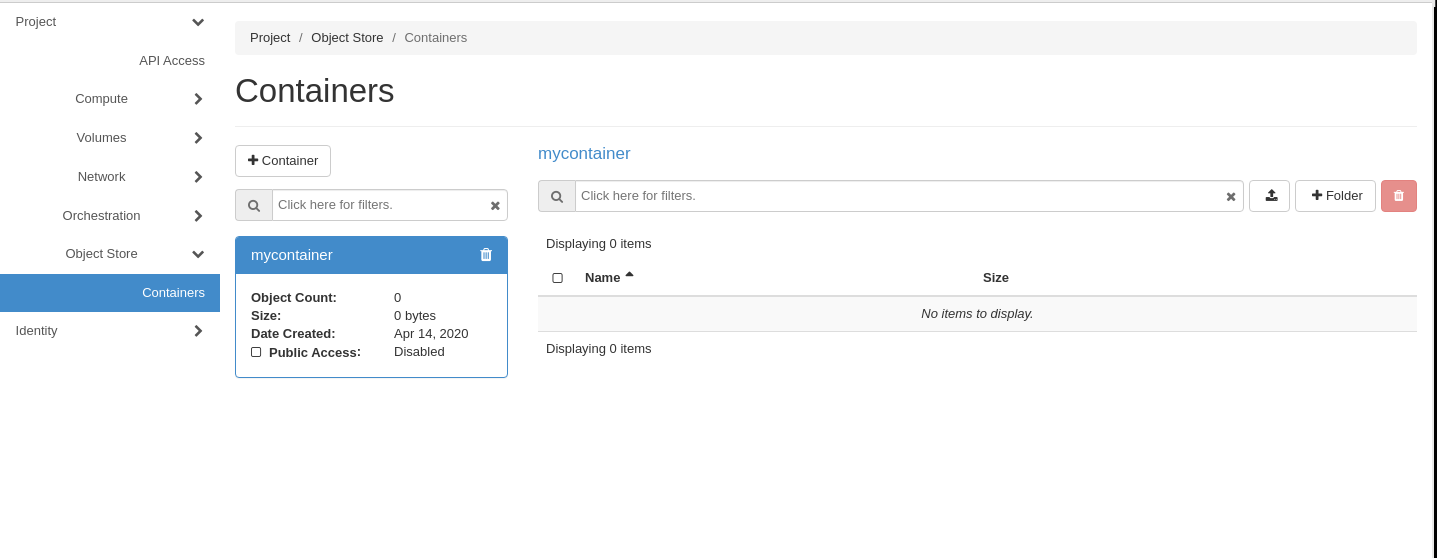
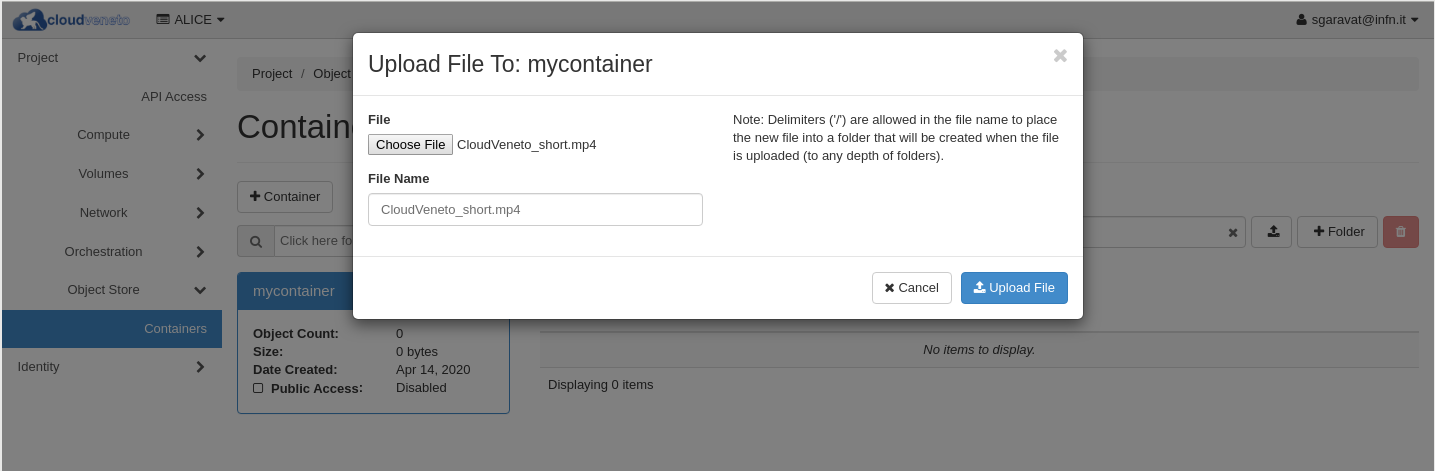
You can then upload files to a container. Select the relevant container and then click on the up arrow:
Choose the file to upload and the click the Upload File button:
Using the dashboard, you can then retrieve the objects (files) previously uploaded to a container.
Warning
Please note that containers (and their objects) are owned by the project, and not by the individual who created them. This means that, if you create a container and upload some files on this container, the other members of the project can see (and also delete) these files.
9.3.2. Accessing the object storage using the S3 interface
You can also access the object storage using the S3 interface.
There are several tools that can be used to interact with the object storage using the S3 interface: in the following subsections we discuss about s3cmd and rclone, which are two tools that can be used.
The use of the S3 interface requires some credentials which consist of an access key ID and a secret access key.
To find your such credentials, in the Dashboard go to Project → API Access and then click on View Credentials: the relevant attributes are referred as “EC2 Access Key” and “EC2 secret Key”.
Note that these are the OpenStack project credentials. This means that using such credentials containers (buckets) and their objects are owned by the project, and not by the individual who created them.
If this is not suitable for your use cases, it is possible to have a personal object storage account, usable through the S3 interface. Please contact support@cloudveneto.it if you have such requirement.
9.3.2.1. Accessing the storage using s3cmd
s3cmd is a convenient command-line tool that can be used to access the object storage using the S3 interface.
First of all you need to create a $HOME/.s3cfg file, that requires the following configuration:
host_base = rgw-cloud.pd.infn.it:443
host_bucket = rgw-cloud.pd.infn.it:443
use_https = true
ca_certs_file = /etc/grid-security/certificates/CloudVenetoCAs.pem
access_key = <your access key>
secret_key = <your secret key>
The CloudVenetoCAs.pem file (referred by the ca_certs_file variable in the configuration file) is needed because the CloudVeneto services are secured using SSL. This file can be downloaded from here.
Note
The certificate can be put anywhere on the client as long as the path you specify is consistent.
To create a bucket in the Object Storage service, you can use s3cmd with the ‘mb’ command:
$ s3cmd mb s3://mybucket
Bucket 's3://mybucket/' created
$
Then with the ‘ls’ command you can verify that the bucket has been created:
$ s3cmd ls
2020-04-14 16:30  s3://mybucket
$
Once created you can start adding files to the bucket:
$ s3cmd put /etc/fstab s3://mybucket
upload: '/etc/fstab' -> 's3://mybucket/fstab'  [1 of 1]
 628 of 628   100% in    0s   780.01 B/s  done
$

$ s3cmd ls s3://mybucket
2020-04-14 16:34       628   s3://mybucket/fstab
$
You can delete files from a bucket with the ‘del’ s3cmd command:
$ s3cmd del s3://mybucket/fstab
delete: 's3://mybucket/fstab'
$

$ s3cmd ls s3://mybucket
$
Once a bucket is empty, you can remove it with the ‘rb’ s3cmd command:
$ s3cmd rb s3://mybucket
Bucket 's3://mybucket/' removed
$

$ s3cmd ls
$
9.3.2.2. Accessing the storage using rclone
Rclone (https://rclone.org) is another tool that can be used to interact with the object storage using the S3 interface.
Installing rclone on you computer is easy on linux systems:
$ curl https://rclone.org/install.sh | sudo bash
Instructions for other operating systems are available at https://rclone.org/install.
Once Rclone is installed, you need to configure it to access the CloudVeneto object storage system. This can be done by creating the file $HOME/.rclone.conf with this content:
[cloudveneto]
type = s3
provider = Ceph
access_key_id =  < your-access-key>
secret_access_key =  <your-secret-key>
endpoint = https://rgw-cloud.pd.infn.it
and set the following variable:
export SSL_CERT_FILE=/etc/grid-security/certificates/CloudVenetoCAs.pem
The CloudVenetoCAs.pem file (referred by the SSL_CERT_FILE variable is needed because the CloudVeneto services are secured using SSL. This file can be downloaded from here.
Note
The certificate can be put anywhere on the client as long as the path you specify is consistent.
To list the objects in your object storage, you can use the ‘rclone ls’ command:
$ rclone ls cloudveneto:
   1285 bucket1/dracut.conf
      0 bucket1/exports
    235 bucket2/hosts
    345 bucket2/my.cnf
   1023 bucket3/nfs.conf
   1746 bucket3/nsswitch.conf
 192019 container--ll/pdf/aa.pdf
 184873 container1/5server-per-Cloud-scientifica-AVCP - Smart CIG.pdf
   1842 container1/8c9f048e.0
  50710 container1/folder/5.pdf
  29780 container1/folder/7.pdf
Using Rclone you can for example mount (please note that the “fuse” package is required) a S3 Cloud object storage bucket as a folder in your virtual machine (or in your desktop or other environment)
E.g with the following command the bucket ‘bucket1’ is mounted in the local folder ‘localfolder’:
$ mkdir localfolder
$ rclone --vfs-cache-mode writes  mount cloudveneto:bucket1 localfolder
The content of the ‘bucket1’ bucket is now available on your local environment under ‘localfolder’. You can list, create and delete files in it. The “–vfs-cache-mode” flag enables file caching (you can use either writes or full option).
To unmount, simply press CTRL-C.
Rclone can also be used, though the sync command, to syncronize an object storage bucket with a local folder or viceversa. The sync command makes the destination (second argument) identical to source (first argument).
E.g.:
$ mkdir local
$ ls local
$ rclone sync cloudveneto:bucket2 local
$ ls local
hosts  my.cnf
After your work is done you may want to copy the modified files to the cloud storage:
$ rclone sync local cloudveneto:bucket2
9.3.2.3. Bucket Access Policies
The CloudVeneto object system supports a subset of the Amazon S3 policy language as documented here.
S3 bucket policy allows you to grant access to your bucket to other projects. Please note that it is only possible to grant access right at the OpenStack project level: it is not possible to grant access right directly to a specific Openstack user.
Let’s now consider some use cases:
Use case 1
Suppose that you belong to a OpenStack project called ‘AdminTesting’ (Openstack project id: b38a0dab349e42bdbb469274b20a91b4) and you are the owner of a bucket called ‘bucket1’, and you want to share it in read only mode to everyone. To implement such use case prepare a policy file called e.g. example1.json:
{
 "Version": "2012-10-17",
 "Id": "read-only",
 "Statement": [
   {
     "Sid": "project-read",
     "Effect": "Allow",
     "Principal": {
       "AWS": "*"
     },
     "Action": [
       "s3:ListBucket",
       "s3:GetObject"
     ],
     "Resource": [
       "arn:aws:s3:::*"
     ]
   }
 ]
}
Then, as bucket’s owner, uses the s3cmd command to apply the policy on the bucket:
$ s3cmd -c s3-AdminTesting.cfg setpolicy example1.json s3://bucket1
s3://bucket1/: Policy updated
$
You can then check the policies defined for your bucket:
$ s3cmd -c s3-AdminTesting.cfg info s3://bucket1
s3://bucket1/ (bucket):
   Location:  cloudprod
   Payer:     BucketOwner
   Expiration Rule: none
   Policy:    {
 "Version": "2012-10-17",
 "Id": "read-only",
 "Statement": [
   {
     "Sid": "project-read",
     "Effect": "Allow",
     "Principal": {
       "AWS": "*"
     },
     "Action": [
       "s3:ListBucket",
       "s3:GetObject"
     ],
     "Resource": [
       "arn:aws:s3:::*"
     ]
   }
 ]
}
   CORS:      none
   ACL:       AdminTesting: FULL_CONTROL
$
Now users belonging to other projects can read the content of your bucket:
$ s3cmd -c s3-AstroCosmo.cfg ls s3://b38a0dab349e42bdbb469274b20a91b4:bucket1
2021-09-30 05:22         1285  s3://b38a0dab349e42bdbb469274b20a91b4:bucket1/dracut.conf
2021-09-30 05:22            0  s3://b38a0dab349e42bdbb469274b20a91b4:bucket1/exports
$

$ s3cmd -c s3-Magic.cfg ls s3://b38a0dab349e42bdbb469274b20a91b4:bucket1
2021-09-30 05:22         1285  s3://b38a0dab349e42bdbb469274b20a91b4:bucket1/dracut.conf
2021-09-30 05:51            0  s3://b38a0dab349e42bdbb469274b20a91b4:bucket1/exports
$

$ s3cmd -c s3-AstroCosmo.cfg get s3://b38a0dab349e42bdbb469274b20a91b4:bucket1/dracut.conf
download: 's3://b38a0dab349e42bdbb469274b20a91b4:bucket1/dracut.conf' -> './dracut.conf'  [1 of 1]
 1285 of 1285   100% in    0s     2.08 KB/s  done
$
Use case 2
Suppose now that you belong to a OpenStack project called ‘AdminTesting’ (Openstack project id: b38a0dab349e42bdbb469274b20a91b4) and you are the owner of a bucket called ‘bucket2’, and you want to share it in read only mode only to members of OpenStack project called ‘AstroCosmo’ (Openstack project id: 3d0ab98b833043cb9ab94e6c9f2bdd19).
To implement such use case prepare a policy file called e.g. example2.json:
{
 "Version": "2012-10-17",
 "Id": "read-only",
 "Statement": [
   {
     "Sid": "project-read",
     "Effect": "Allow",
     "Principal": {
       "AWS": "arn:aws:iam::3d0ab98b833043cb9ab94e6c9f2bdd19:root"
     },
     "Action": [
       "s3:ListBucket",
       "s3:GetObject"
     ],
     "Resource": [
       "arn:aws:s3:::*"
     ]
   }
 ]
}
Then, as bucket’s owner, uses the s3cmd command to apply the policy on the bucket:
$ s3cmd -c s3-AdminTesting.cfg setpolicy example2.json s3://bucket2
s3://bucket2/: Policy updated
$
Users belonging to ‘AstroCosmo’ project can now read the content of your bucket:
$ s3cmd -c s3-AstroCosmo.cfg ls s3://b38a0dab349e42bdbb469274b20a91b4:bucket2
2021-09-30 05:52          235  s3://b38a0dab349e42bdbb469274b20a91b4:bucket2/hosts
2021-09-30 05:52          345  s3://b38a0dab349e42bdbb469274b20a91b4:bucket2/my.cnf
$
while users of other projects can’t:
$ s3cmd -c s3-Magic.cfg ls s3://b38a0dab349e42bdbb469274b20a91b4:bucket2
ERROR: Access to bucket 'b38a0dab349e42bdbb469274b20a91b4:bucket2' was denied
ERROR: S3 error: 403 (AccessDenied)
$
Use case 3
As said above, the object storage service supports also “personal accounts” besides the ones related to OpenStack projects. Suppose that you belong to an OpenStack project called ‘AdminTesting’ (Openstack project id: b38a0dab349e42bdbb469274b20a91b4) and you are the owner of a bucket called ‘bucket3’, and you want to share it in read only mode only to the “personal account” ‘sgaravat’.
To implement such use case prepare a policy file called e.g. example3.json:
{
 "Version": "2012-10-17",
 "Id": "read-only",
 "Statement": [
   {
     "Sid": "project-read",
     "Effect": "Allow",
     "Principal": {
        "AWS": "arn:aws:iam:::user/sgaravat"
     },
     "Action": [
       "s3:ListBucket",
       "s3:GetObject"
     ],
     "Resource": [
       "arn:aws:s3:::*"
     ]
   }
 ]
}
Then, as bucket’s owner, uses the s3cmd command to apply the policy on the bucket:
$ s3cmd -c s3-AdminTesting.cfg setpolicy example3.json s3://bucket3
s3://bucket3/: Policy updated
$
User ‘sgaravat’ can now now read the content of such bucket:
$ s3cmd -c s3-sgaravat.cfg ls s3://b38a0dab349e42bdbb469274b20a91b4:bucket3
2021-10-15 05:01         1023  s3://b38a0dab349e42bdbb469274b20a91b4:bucket3/nfs.conf
2021-10-15 05:01         1746  s3://b38a0dab349e42bdbb469274b20a91b4:bucket3/nsswitch.conf
$
while other users can’t:
$ s3cmd -c s3-Magic.cfg ls s3://b38a0dab349e42bdbb469274b20a91b4:bucket3
ERROR: Access to bucket 'b38a0dab349e42bdbb469274b20a91b4:bucket3' was denied
ERROR: S3 error: 403 (AccessDenied)
$
Use case 4
Suppose now that you have a “personal account”, and you are the owner of a bucket called ‘bucket4’, and you want to share it in read only mode only to members of of OpenStack project called ‘AstroCosmo’ (Openstack project id: 3d0ab98b833043cb9ab94e6c9f2bdd19).
To implement such use case prepare a policy file called e.g. example4.json:
{
 "Version": "2012-10-17",
 "Id": "read-only",
 "Statement": [
   {
     "Sid": "project-read",
     "Effect": "Allow",
     "Principal": {
       "AWS": "arn:aws:iam::3d0ab98b833043cb9ab94e6c9f2bdd19:root"
     },
     "Action": [
       "s3:ListBucket",
       "s3:GetObject"
     ],
     "Resource": [
       "arn:aws:s3:::*"
     ]
   }
 ]
}
Then, as bucket’s owner, uses the s3cmd command to apply the policy on the bucket:
$ s3cmd -c s3-sgaravat.cfg setpolicy example4.json s3://bucket4
s3://bucket4/: Policy updated
$
Members of project AstroCosmo can now now read the content of such bucket:
$ s3cmd -c s3-AstroCosmo.cfg ls s3://:bucket4
2021-10-15 11:51          524  s3://:bucket4/auto.misc
2021-10-15 11:51        21929  s3://:bucket4/brltty.conf
$
while other users can’t:
$ s3cmd -c s3-Magic.cfg ls s3://:bucket4
ERROR: Access to bucket ':bucket4' was denied
ERROR: S3 error: 403 (AccessDenied)
Note
To get the OpenStack project ID, using the Dashboard, click on Project → API Access and then View Credentials.
Warning
Bucket policies can get quite large, note that there is a 20 kB size limit per policy.
9.4. Accessing storage external to the Cloud
As explained in Network Access, from an instance of the Cloud by default it is not possible to access a host/service hosted in INFN Padova or Legnaro. This also means that by default on a virtual machine of the CloudVeneto it is not possible to mount a file system exported from a storage server hosted in INFN Padova or Legnaro.